Azure has two different deployment models for creating and working with resources:Resource Manager and classic. This article covers using both models, but Microsoft recommends that most new deployments use the Resource Manager model.
You cannot connect to Microsoft Azure Windows Virtual Machine (VM) after you disable the default Network Interface (NIC) or manually sets a static IP for the NIC. This article shows how to reset the network interface for Azure Windows VM, which will resolve the remote connection issue.
If your Azure issue is not addressed in this article, visit the Azure forums on MSDN and the Stack Overflow. You can post your issue in these forums, or post to . You also can submit an Azure support request.

Reset network interface
For Classic VMs
To reset network interface, follow these steps:
- Go to the Azure portal.
- Select Virtual Machines (Classic).
- Select the affected Virtual Machine.
- Select IP addresses.
- If the Private IP assignment is not Static, change it to Static.
- Change the IP address to another IP address that is available in the Subnet.
- Select Save.
- The virtual machine will restart to initialize the new NIC to the system.
- Try to RDP to your machine. If successful, you can change the Private IP address back to the original if you would like. Otherwise, you can keep it.
For VMs deployed in Resource group model
- Go to the Azure portal.
- Select the affected Virtual Machine.
- Select Network Interfaces.
- Select the Network Interface associated with your machine
- Select IP configurations.
- Select the IP.
- If the Private IP assignment is not Static, change it to Static.
- Change the IP address to another IP address that is available in the Subnet.
- The virtual machine will restart to initialize the new NIC to the system.
- Try to RDP to your machine. If successful, you can change the Private IP address back to the original if you would like. Otherwise, you can keep it.
Delete the unavailable NICs
After you can remote desktop to the machine, you must delete the old NICs to avoid the potential problem:
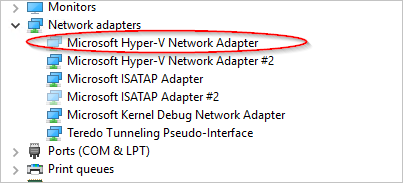
- Open Device Manager.
- Select View > Show hidden devices.
- Select Network Adapters.
- Check for the adapters named as "Microsoft Hyper-V Network Adapter".
-
You might see an unavailable adapter that is grayed out. Right-click the adapter and then select Uninstall.
Note
Only uninstall the unavailable adapters that have the name "Microsoft Hyper-V Network Adapter". If you uninstall any of the other hidden adapters, it could cause additional issues.
-
Now all unavailable adapter should be cleared out from your system.
Windows Azure: How to enable your Ethernet Network Adapter in an Azure VM?
What happens when you disable an Ethernet Network adapter in Windows Azure Virtual Machine?
How do you enable a Ethernet Network Adapter in Windows Azure Virtual Machine in case you have disabled it?
Is it possible to access the same virtual machine without deleting and re-creating the one from scratch in case you have disabled the one an only Ethernet network adapter?
These were the sort of questions that I faced recently, after I created a new virtual machine in windows azure. I mistakenly disabled the one and only Ethernet network adapter in windows azure virtual machine. The impact of it was that I lost the access to the Azure VM’s remote desktop connection.
I was no longer able to access the VM remotely. I was having no clue as to how to access the VM again after losing the remote connectivity.
I tried searching for the options on my windows azure portal but could not find any interface where I can enable the adapter again. Interestingly, When I asked some people about the solution to this problem they also didn’t had any clue on how to achieve this task.
I thought that there must be some way out, hence downloaded the windows azure power shell module. Surprisingly, i cannot find any command-let in power shell that i can use to fix my issue.
After struggling for some time, I again went back to the windows azure portal and thought of expanding the VM size from small to medium. After i made this change, i tried accessing the VM again and woooo hoooo…. I was able to access it again. I than restored the VM again back to the size that i assigned it initially. Below are the steps on how you can achieve it.
1. Log in to your windows azure management portal
2. Select Virtual Machine as an option from the Left Navigation
3. Select the VM for which you need to enable the network adapter again

4. Click on the VM Name
5. Click on the CONFIGURE option on the top navigation

6. Change the VIRTUAL Machine Size to any value

7. Save the changes by clicking the SAVE button that appears on the bottom of the screen

8. After the changes have been applied successfully, revert back the Virtual Machine Size to the original size that you’ve initially configured for this VM.
9. Try to establish a remote desktop connection with this VM, and you’ll now be able to successfully access it again that too without losing any data!
Troubleshoot Remote Desktop connections to an Azure virtual machine
The Remote Desktop Protocol (RDP) connection to your Windows-based Azure virtual machine (VM) can fail for various reasons, leaving you unable to access your VM. The issue can be with the Remote Desktop service on the VM, the network connection, or the Remote Desktop client on your host computer. This article guides you through some of the most common methods to resolve RDP connection issues.
If you need more help at any point in this article, you can contact the Azure experts on the MSDN Azure and Stack Overflow forums. Alternatively, you can file an Azure support incident. Go to the Azure support site and select Get Support.
Quick troubleshooting steps
After each troubleshooting step, try reconnecting to the VM:
- Reset Remote Desktop configuration.
- Check Network Security Group rules / Cloud Services endpoints.
- Review VM console logs.
- Reset the NIC for the VM.
- Check the VM Resource Health.
- Reset your VM password.
- Restart your VM.
- Redeploy your VM.
Continue reading if you need more detailed steps and explanations. Verify that local network equipment such as routers and firewalls are not blocking outbound TCP port 3389, as noted in detailed RDP troubleshooting scenarios.
Tip
If the Connect button for your VM is grayed out in the portal and you are not connected to Azure via an Express Route or Site-to-Site VPN connection, you need to create and assign your VM a public IP address before you can use RDP. You can read more about public IP addresses in Azure.
Ways to troubleshoot RDP issues
You can troubleshoot VMs created using the Resource Manager deployment model by using one of the following methods:
- Azure portal - great if you need to quickly reset the RDP configuration or user credentials and you don't have the Azure tools installed.
- Azure PowerShell - if you are comfortable with a PowerShell prompt, quickly reset the RDP configuration or user credentials using the Azure PowerShell cmdlets.1
You can also find steps on troubleshooting VMs created using the Classic deployment model.
Troubleshoot using the Azure portal
After each troubleshooting step, try connecting to your VM again. If you still cannot connect, try the next step.
-
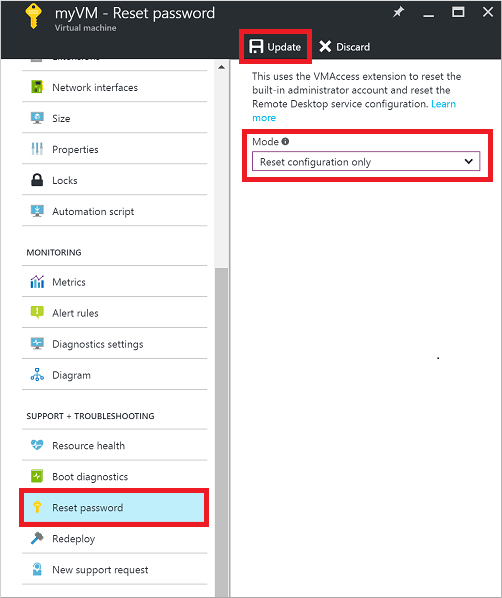
Reset your RDP connection. This troubleshooting step resets the RDP configuration when Remote Connections are disabled or Windows Firewall rules are blocking RDP, for example.
Select your VM in the Azure portal. Scroll down the settings pane to the Support + Troubleshooting section near bottom of the list. Click the Reset password button. Set the Mode to Reset configuration only and then click the Update button:
-
Verify Network Security Group rules. Use IP flow verify to confirm if a rule in a Network Security Group is blocking traffic to or from a virtual machine. You can also review effective security group rules to ensure inbound "Allow" NSG rule exists and is prioritized for RDP port(default 3389). For more information, see Using Effective Security Rules to troubleshoot VM traffic flow.
-
Review VM boot diagnostics. This troubleshooting step reviews the VM console logs to determine if the VM is reporting an issue. Not all VMs have boot diagnostics enabled, so this troubleshooting step may be optional.
Specific troubleshooting steps are beyond the scope of this article, but may indicate a wider problem that is affecting RDP connectivity. For more information on reviewing the console logs and VM screenshot, see Boot Diagnostics for VMs.
-
Reset the NIC for the VM. For more information, see how to reset NIC for Azure Windows VM.
-
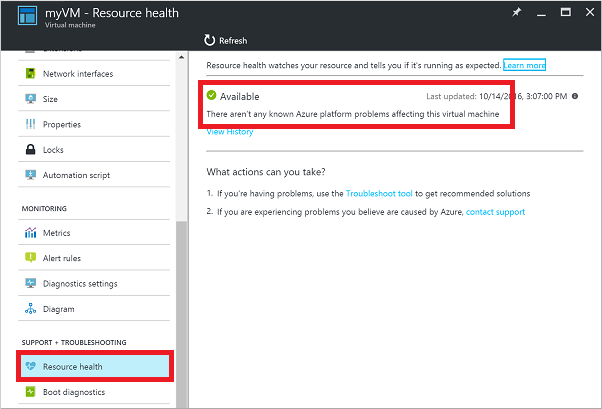
Check the VM Resource Health. This troubleshooting step verifies there are no known issues with the Azure platform that may impact connectivity to the VM.
Select your VM in the Azure portal. Scroll down the settings pane to the Support + Troubleshooting section near bottom of the list. Click the Resource health button. A healthy VM reports as being Available:
-
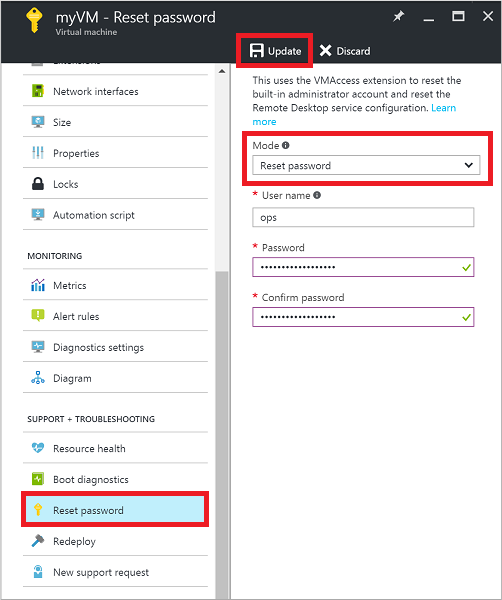
Reset user credentials. This troubleshooting step resets the password on a local administrator account when you are unsure or have forgotten the credentials.
Select your VM in the Azure portal. Scroll down the settings pane to the Support + Troubleshooting section near bottom of the list. Click the Reset password button. Make sure the Mode is set to Reset password and then enter your username and a new password. Finally, click the Update button:
-
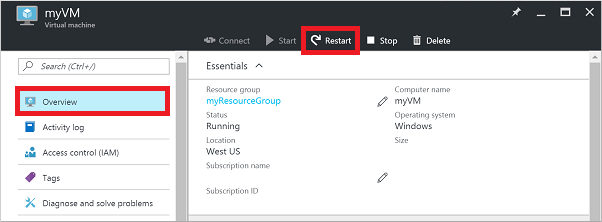
Restart your VM. This troubleshooting step can correct any underlying issues the VM itself is having.
Select your VM in the Azure portal and click the Overview tab. Click the Restart button:
-
Redeploy your VM. This troubleshooting step redeploys your VM to another host within Azure to correct any underlying platform or networking issues.
Select your VM in the Azure portal. Scroll down the settings pane to the Support + Troubleshooting section near bottom of the list. Click the Redeploy button, and then click Redeploy:

After this operation finishes, ephemeral disk data is lost and dynamic IP addresses that are associated with the VM are updated.
If you are still encountering RDP issues, you can open a support request
Troubleshoot using Azure PowerShell
If you haven't already, install and configure the latest Azure PowerShell.
The following examples use variables such as myResourceGroup, myVM, and myVMAccessExtension. Replace these variable names and locations with your own values.
Note
You reset the user credentials and the RDP configuration by using the Set-AzureRmVMAccessExtension PowerShell cmdlet. In the following examples, myVMAccessExtension is a name that you specify as part of the process. If you have previously worked with the VMAccessAgent, you can get the name of the existing extension by using Get-AzureRmVM -ResourceGroupName "myResourceGroup" -Name "myVM" to check the properties of the VM. To view the name, look under the 'Extensions' section of the output.
After each troubleshooting step, try connecting to your VM again. If you still cannot connect, try the next step.
-
Reset your RDP connection. This troubleshooting step resets the RDP configuration when Remote Connections are disabled or Windows Firewall rules are blocking RDP, for example.
The follow example resets the RDP connection on a VM named
myVMin theWestUSlocation and in the resource group namedmyResourceGroup:PowerShellCopy
Set-AzureRmVMAccessExtension -ResourceGroupName "myResourceGroup" ` -VMName "myVM" -Location Westus -Name "myVMAccessExtension" -
Verify Network Security Group rules. This troubleshooting step verifies that you have a rule in your Network Security Group to permit RDP traffic. The default port for RDP is TCP port 3389. A rule to permit RDP traffic may not be created automatically when you create your VM.
First, assign all the configuration data for your Network Security Group to the
$rulesvariable. The following example obtains information about the Network Security Group namedmyNetworkSecurityGroupin the resource group namedmyResourceGroup:PowerShellCopy
$rules = Get-AzureRmNetworkSecurityGroup -ResourceGroupName "myResourceGroup" `
    -Name "myNetworkSecurityGroup"
Now, view the rules that are configured for this Network Security Group. Verify that a rule exists to allow TCP port 3389 for inbound connections as follows:
PowerShellCopy
$rules.SecurityRulesThe following example shows a valid security rule that permits RDP traffic. You can see
Protocol,DestinationPortRange,Access, andDirectionare configured correctly:PowerShellCopy
Name                     : default-allow-rdp
Id                       : /subscriptions/guid/resourceGroups/myResourceGroup/providers/Microsoft.Network/networkSecurityGroups/myNetworkSecurityGroup/securityRules/default-allow-rdp
Etag                     :
ProvisioningState        : Succeeded
Description              :
Protocol                 : TCP
SourcePortRange          : *
DestinationPortRange     : 3389
SourceAddressPrefix      : *
DestinationAddressPrefix : *
Access                   : Allow
Priority                 : 1000
Direction                : Inbound
If you do not have a rule that allows RDP traffic, create a Network Security Group rule. Allow TCP port 3389.
-
Reset user credentials. This troubleshooting step resets the password on the local administrator account that you specify when you are unsure of, or have forgotten, the credentials.
First, specify the username and a new password by assigning credentials to the
$credvariable as follows:PowerShellCopy
$cred=Get-CredentialNow, update the credentials on your VM. The following example updates the credentials on a VM named
myVMin theWestUSlocation and in the resource group namedmyResourceGroup:PowerShellCopy
Set-AzureRmVMAccessExtension -ResourceGroupName "myResourceGroup" ` -VMName "myVM" -Location WestUS -Name "myVMAccessExtension" ` -UserName $cred.GetNetworkCredential().Username ` -Password $cred.GetNetworkCredential().Password -
Restart your VM. This troubleshooting step can correct any underlying issues the VM itself is having.
The following example restarts the VM named
myVMin the resource group namedmyResourceGroup:PowerShellCopy
Restart-AzureRmVM -ResourceGroup "myResourceGroup" -Name "myVM" -
Redeploy your VM. This troubleshooting step redeploys your VM to another host within Azure to correct any underlying platform or networking issues.
The following example redeploys the VM named
myVMin theWestUSlocation and in the resource group namedmyResourceGroup:PowerShellCopy
Set-AzureRmVM -Redeploy -ResourceGroupName "myResourceGroup" -Name "myVM"
If you are still encountering RDP issues, you can open a support request.
Troubleshoot VMs created using the Classic deployment model
After each troubleshooting step, try reconnecting to the VM.
-
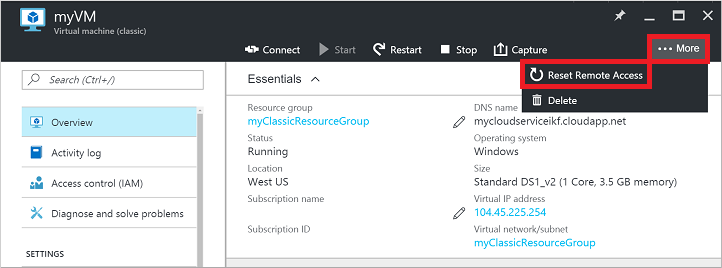
Reset your RDP connection. This troubleshooting step resets the RDP configuration when Remote Connections are disabled or Windows Firewall rules are blocking RDP, for example.
Select your VM in the Azure portal. Click the ...More button, then click Reset Remote Access:
-
Verify Cloud Services endpoints. This troubleshooting step verifies that you have endpoints in your Cloud Services to permit RDP traffic. The default port for RDP is TCP port 3389. A rule to permit RDP traffic may not be created automatically when you create your VM.
Select your VM in the Azure portal. Click the Endpoints button to view the endpoints currently configured for your VM. Verify that endpoints exist that allow RDP traffic on TCP port 3389.
The following example shows valid endpoints that permit RDP traffic:
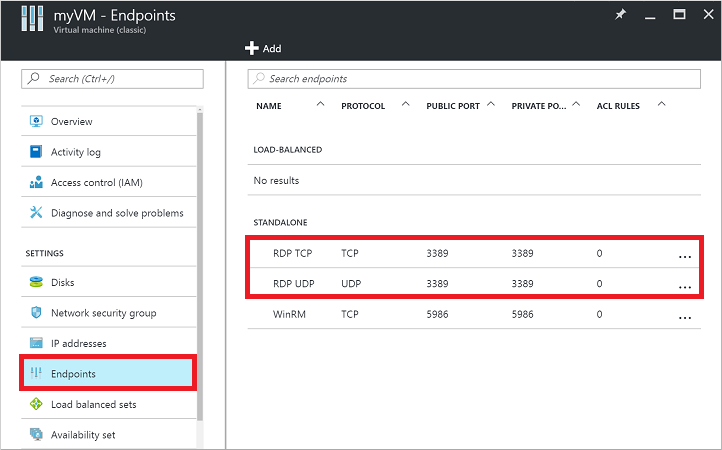
If you do not have an endpoint that allows RDP traffic, create a Cloud Services endpoint. Allow TCP to private port 3389.
-
Review VM boot diagnostics. This troubleshooting step reviews the VM console logs to determine if the VM is reporting an issue. Not all VMs have boot diagnostics enabled, so this troubleshooting step may be optional.
Specific troubleshooting steps are beyond the scope of this article, but may indicate a wider problem that is affecting RDP connectivity. For more information on reviewing the console logs and VM screenshot, see Boot Diagnostics for VMs.
-
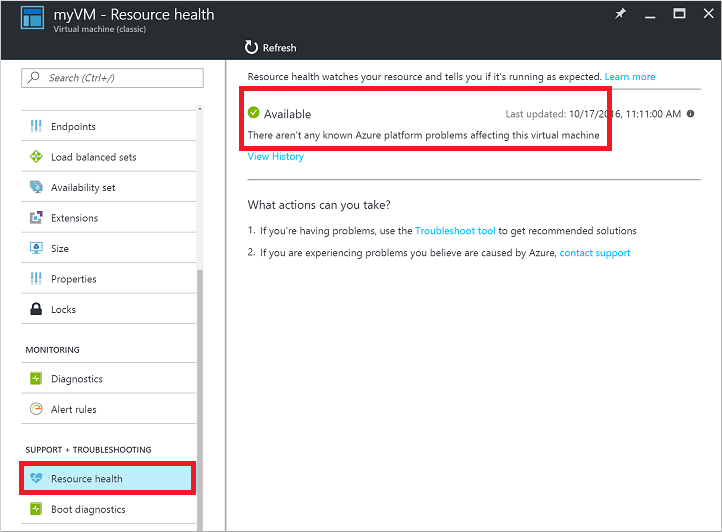
Check the VM Resource Health. This troubleshooting step verifies there are no known issues with the Azure platform that may impact connectivity to the VM.
Select your VM in the Azure portal. Scroll down the settings pane to the Support + Troubleshooting section near bottom of the list. Click the Resource Health button. A healthy VM reports as being Available:
-
Reset user credentials. This troubleshooting step resets the password on the local administrator account that you specify when you are unsure or have forgotten the credentials.
Select your VM in the Azure portal. Scroll down the settings pane to the Support + Troubleshooting section near bottom of the list. Click the Reset password button. Enter your username and a new password. Finally, click the Save button:

-
Restart your VM. This troubleshooting step can correct any underlying issues the VM itself is having.
Select your VM in the Azure portal and click the Overview tab. Click the Restart button:

This comment has been removed by the author.
ReplyDeleteWE UPDATED NEW LINKS
ReplyDelete354VHd5444fa298Here are best materials for you!
BEST VIDEO ABOUT HOW TO MAKE MONEY ONLINE:
I found this is No1 video about how to make money online
Hope that it help you more
source: 12 ways to make money online in your lifetime
Jennifer Lee Mar 21, 2018 at 7:36 PM
LEARN FREE HOW TO MAKE MONEY ONLINE BY AFFILIATE MARKETING
This is a free course by affilorama, the leading internet marketing academy,rated 4.7 * by 87k+ students.
source: Free training affiliate marketing online
John Smith Mar 23, 2018 at 8:36 PM
LEARN HOW TO BECOME MILLIONAIRE ONLINE
This is one of best online course about how to become millionaire online.
It is difficult to become a millionaire, so perhaps this course is only rated 4.4*.
source: How to become millionaire online in one year
Juan Carlos Mar 27, 2018 at 8:36 PM
12 SECRETS TO GET ANY GIRL TO LIKE YOU
This is one of top secrets that help you get any girl to like you.
Rated 4.7* by 5600+ students.
Link: 12 secrets to get any girl to like you
Mike Jones Mar 29, 2018 at 9:36 PM
LEARN FREE PIANO ONLINE:
This course is organized by LearnPianoIn30Days. This site offer 14 days free training for only $1.
More details: $1 Trial to learn piano in 14 days
1ad444b2David Smith April 1, 2018 at 10:36 PM
Delete13 SECRETS TO CAPTIVATE ANY MAN:
This is one of top secrets that help you get any girl to like you.
Rated 4.7* by 5600+ students.
Link: 13 secrets to captivate any man
David Hu April 2, 2018 at 10:36 PM
LEARN FREE GUITAR ONLINE:
This course is organized by LearnPianoIn30Days. This site offer 21 days free training for only $1.
More details: Trial 1$ learn guitar online in 21 days
Peter Ho April 3, 2018 at 14:36 PM
DO YOU LOVE MAGIC?
This is best course online about how to become a magician!
This training course offer free trial and 60 days money back guarantee
Link: Trial to Learn Mentalism Effects and Magic Tricks
Jennifer Tran April 3, 2018 at 19:36 PM
HOW TO LOSE 1 POUND OF BELLY FAT EVERY 72 HOURS?
yes it can. Bruce Krahn and Dr. Heinrick created this program specifically for men and woman.
The core of the program is a formula by Heinrick that is supposed to work well against belly fat and its associated health issues
Here are link: Link: Secrets to lose 1 pound of belly fat every 72 hours
Very clear cut information provided by you thanks for more update Azure Online Training
ReplyDeleteI like viewing web sites which comprehend the price of delivering the excellent useful resource free of charge. I truly adored reading your posting. Thank you! windows vps
ReplyDeleteI am impressed by the information that you have on this blog. It shows how well you understand this subject. windows 10 bsod
ReplyDeleteThe contents are easy to understand. every content should be very neatly arranged and segregate by the author.
ReplyDeleteAzure Training in Chennai | Certification | Azure Online Training Course | Azure Training in Bangalore | Certification | Azure Online Training Course | Azure Training in Hyderabad | Certification | Azure Online Training Course | Azure Training in Pune | Certification | Azure Online Training Course | Azure Training | microsoft azure certification | Azure Online Training Course
با تحلیل این دادهها، میتوانید محتوای سایت خود را در گوگل بهبود دهید و تجربه کاربری بهتری فراهم کنید. یکی از جنبههای مهم سئو سایت به زبان کردی، استفاده از تحلیلهای آماری و دادههای جستجو برای بهبود عملکرد سایت است. ابزارهای مختلفی مانند گوگل آنالیتیکس و کنسول جستجوی گوگل میتوانند به شما کمک کنند تا رفتار کاربران را درک کنید و محتوا و استراتژیهای خود را بر اساس آن تنظیم کنید. این اطلاعات میتواند به شما نشان دهد که کدام صفحات وب بیشترین ترافیک را دارند، کاربران از کدام کلمات کلیدی استفاده میکنند و چه موضوعاتی برای آنها جذابتر است.
ReplyDelete