How to convert a .pem file into a .ppk, and vice versa on Windows or Linux
byLiveStream-
0
PuTTYgen is an key generator tool for creating SSH keys for PuTTY. It is analogous to the ssh-keygen tool used in some other SSH implementations.
The basic function is to create public and private key pairs. PuTTY stores keys in its own format in .ppk files. However, the tool can also convert keys to and from other formats.
PuTTYgen.exe on Windows is a graphical tool. A command-line version is available for Linux
PuTTYgen download and install
PuTTYgen is normally installed as part of the normal PuTTY .msi package installation. There is no need for a separate PuTTYgen download.
Running PuTTYgen
Go to Windows Start menu → All Programs → PuTTY → PuTTYgen.
Creating a new key pair for authentication
To create a new key pair, select the type of key to generate from the bottom of the screen (using SSH-2 RSA with 2048 bit key size is good for most people; another good well-known alternative is ECDSA).
Then click Generate, and start moving the mouse within the Window. Putty uses mouse movements to collect randomness. The exact way you are going to move your mouse cannot be predicted by an external attacker. You may need to move the mouse for some time, depending on the size of your key. As you move it, the green progress bar should advance.
Once the progress bar becomes full, the actual key generation computation takes place. This may take from several seconds to several minutes. When complete, the public key should appear in the Window. You can now specify a passphrase for the key.
You should save at least the private key by clicking Save private key. It may be advisable to also save the public key, though it can be later regenerated by loading the private key (by clicking Load).
We strongly recommended using a passphrase be for private key files intended for interactive use. If keys are needed for automation (e.g., with WinSCP, then they may be left without a passphrase.
Installing the public key as an authorized key on a server
With both Tectia SSH and OpenSSH servers, access to an account is granted by adding the public key to a ~/.ssh/authorized_keys file on the server.
To install the public key, Log into the server, edit the authorized_keys file with your favorite editor, and cut-and-paste the public key output by the above command to the authorized_keys file. Save the file. Configure PuTTY to use your private key file (here keyfile.ppk). Then test if login works. See configuring public key authentication for PuTTY.
Managing SSH keys
In larger organizations, the number of SSH keys on servers and clients can easily grow to tens of thousands, in some cases to millions of keys. In large quantities, SSH keys can become a massive security risk and they can violate compliance requirements.
Universal SSH Key Manager can manage PuTTY keys in addition to OpenSSH and Tectia keys. It works with legacy keys on traditional servers as well as dynamic and keyless elastic environments in the cloud. Any larger organization should ensure they have proper provisioning and termination processes for SSH keys as part of their Identify and Access Management (IAM) practice.
Changing the passphase of a key
It is recommended that all SSH keys be regenerated and changed periodically. The Universal SSH Key Manager can automate this. Just changing the passphrase is no substitute, but it is better than nothing. These instructions can also be used to add a passphrase to a key that was created without one.
To change the passphrase, click on Load to load an existing key, then enter a new passphrase, and click Save private key to save the private key with the new passphrase. Be sure to properly destroy and wipe the old key file. Creating a new file with a new passphrase will not help if the old file remains available.
I needed to create the RSA private key to use it in a particular project.But I faced some issues with this. When I created a key using ssh-keygen this created a OpenSSH RSA private key.
If you take a look in your private key using cat ~/.ssh/id_rsa commandyou can see that your key has the following format:
How do I convert Privacy Enhanced Mail (.pem) file to a PuTTY Private Key (.ppk) file OR convert a .ppk file to a .pem file?
Resolution
Windows - install PuTTYgen
Most Windows operating systems have PuTTY installed. If your system doesn't, download and install PuTTYgen.
Windows - convert a .pem file to a .ppk file
Start PuTTYgen, and then convert the .pem file to a .ppk file. For detailed steps, see Convert Your Private Key Using PuTTYgen.
Windows - convert a .ppk file to a .pem file
Start PuTTYgen. For Actions, choose Load, and then navigate to your .ppk file.
Choose the .ppk file, and then choose Open.
(Optional) For Key passphrase, enter a passphrase. For Confirm passphrase, re-enter your passphrase. Note: Although a passphrase isn't required, you should specify one as a security measure to protect the private key from unauthorized use. Using a passphrase makes automation difficult, because human intervention is needed to log in to an instance or to copy files to an instance.
From the menu at the top of the PuTTY Key Generator, choose Conversions, Export OpenSSH Key. Note: If you didn't enter a passphrase, you receive a PuTTYgen warning. Choose Yes.
Name the file and add the .pem extension.
Choose Save.
Unix or Linux - install PuTTY
Install PuTTY, if it's not already on your system.
Important: A PuTTY package is provided by the Extra Packages for Enterprise Linux (EPEL) repository. You must enable the EPEL repository before you install PuTTY.
To install PuTTY, run one of the following commands:
RPM-based
$ sudo yum install putty
Dpkg-based
$sudo apt-get install putty-tools
Unix or Linux - convert a .pem file to a .ppk file
On the instance shell, run the puttygen command to convert your .pem file to a .ppk file:
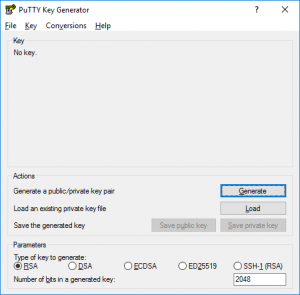
Click on Start menu> All Programs > PuTTY > PuTTYgen.
puttygen-window
The following window will present with options on the crucial a user wants to generate. Select the option ‘RSA (Rivest–Shamir–Adleman). RSA is a public-key cryptosystem that is commonly used to transmit data securely. Users with an older version of PuTTY should select the option – ‘SSH-2 RSA.’
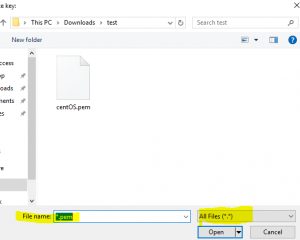
Load .PEM file to puttygen
Next, click on the option ‘Load.’ As PuTTY supports its native file format, it will only show files that have .ppk file extension. Therefore, users have to choose the ‘All Files’ option from the drop-down bar. It will display all key files included the .pem file.
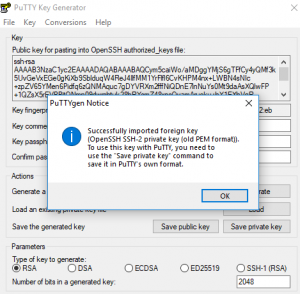
save private key
Now, select the .pem file that you want to convert. As aforementioned that PuTTYgen is used for SSH connectivity, so it crucial for users to select the specific file that they plan to convert and click ‘Open.’ To confirm, click on ‘OK.’
In the resultant window, click on ‘Save private key’ which will convert and save the key file in PuTTY compatible format.
PuTTYgen will prompt a warning of saving the key without a passphrase. Hit ‘Yes’ on it.
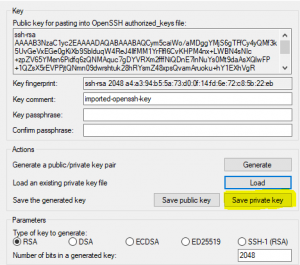
save private key
Now, give the name to your file and PuTTYgen will automatically add .ppk file extension.
Note – Passphrases provide extra protection, but it sometimes gets annoying as each time a user copies files they have to enter the passphrase. Although, it entirely depends on the user if they wish or don’t wish to add the extra layer of protection
Once the file is converted to PuTTY compatible format, users can connect their local machine with remote servers.
Converting .Pem to .Ppk on Unix or Linux
To convert the file on Unix is far simpler than Windows. Users are first required to install PuTTY application on their Unix machines. Once done, all a user must do is enter a one-line command. First, run the PuTTYgen command and type the below-written command:
Voila! The .pem files will quickly be converted to PuTTY native file format. Users can connect via PuTTY to remote servers from local systems using the newly created .ppk files on both Windows and Unix.
Connect Using PuTTY
Once the .pem file is converted .ppk then users can connect to remote hosts using PuTTY’s SSH client. Below are steps to launch a PuTTY session.
First, open PuTTY and input the host IP address. Please note that an SSL VPN connection must be established if the connection is to with 10.X private address.
Now, from the category pane, navigate to Connection and expand SSH and the Auth.
Click on ‘Browse’ and select the newly converted .ppk file, that was generated using PuTTYgen.
Now to commence the PuTTY session, choose the option ‘open.’
Note: If the remote and local hosts connect for the first time using PuTTY then the application will pop up a dialog box confirming the authenticity of the connection. It just provides an added layer of security, so click ‘Yes’ when it appears.


 You may found some articles/forums saying that you must be downgrade your ssh-keygen but it’s not necessary.