You can download CentOS versions here.
CentOS or Community Enterprise OS is an open source distribution based on RHEL or Red Hat Enterprise Linux. This is available only if you’ve bought the support package. Moreover, all RHEL packages are fully compatible with CentOS, providing a robust, stable and easy to manage platform, ensuring the highest level of operational security for free.
CentOS is binary compatible with RHEL out of the box and is the preferred platform for server installations. One of the most valuable parts of CentOS is the long support cycle. While the release support cycles for Fedora, for example, last up to 13 months, CentOS releases provide support for up to 7 years. That makes it extremely dependable and reliable.
Furthermore, the CentOS community project is expanding their availability over a large array of platforms like Google, Amazon AWS and others. It’s also available in generic cloud-init enabled images.
To learn more about CentOS visit the CentOS Project here.
By default a full installation of CentOS 7 will have the graphical user interface (GUI) installed and it will load up at boot, however it is possible that the system has been configured to not boot into the GUI.
In this quick guide we will show you how to swap to the GUI and enable it to start up by default on system boot.
Start GUI In CentOS
In this example I have installed CentOS 7 but we are not currently using the GUI. With the systemctl command, we can list the default target that the system is configured to boot into.[root@centos7 ~]# systemctl get-default multi-user.targetThe multi-user.target is similar to the well known run level 3, which is essentially console only with networking enabled.
We can start the GUI right now by running ‘systemctl isolate graphical.target’.
[root@centos7 ~]# systemctl isolate graphical.targetWhile this will start the graphical user interface by moving us into the graphical target (similar to run level 5), if we perform a reboot we will not be presented with the GUI. To do this, we must first set the graphical target to become the default.
[root@centos7 ~]# systemctl set-default graphical.target
Removed symlink /etc/systemd/system/default.target.
Created symlink from /etc/systemd/system/default.target to /usr/lib/systemd/system/graphical.target.
Now if we reboot the system we will automatically boot into the GUI, which ever version you may have installed. If you’re interested in changing things up, check out our posts on installing different GUIs in CentOS.
Getting Started
You can install CentOS with an installation utility called Anaconda. Most users can simply follow the procedure outlined in Interactive Installation to install CentOS using the graphical interface in Anaconda.Users with advanced requirements can also use the graphical interface to configure many aspects of the installation, and install CentOS on a wide variety of systems. On systems without a local interface, installation can be accessed entirely remotely. Installation can also be automated by using a Kickstart file, and performed with no interaction at all.
Graphical Installation
The CentOS installer, Anaconda, provides a simple graphical method to install CentOS. The graphical installation interface has a built-in help system which can guide you through most installations, even if you have never installed Linux before. However, Anaconda can also be used to configure advanced installation options if required.Anaconda is different from most other operating system installation programs due to its parallel nature. Most installers follow a linear path; you must choose your language first, then you configure networking, and so on. There is usually only one way to proceed at any given time.
In the graphical interface in Anaconda you are at first only required to select your language and locale, and then you are presented with a central screen, where you can configure most aspects of the installation in any order you like. While certain parts require others to be completed before configuration - for example, when installing from a network location, you must configure networking before you can select which packages to install - most options in Anaconda can be configured in any order. If a background task, such as network initialization or disk detection, is blocking configuration of a certain option, you can configure unrelated options while waiting for it to complete.
Additional differences appear in certain screens; notably the custom partition process is very different from other Linux distributions. These differences are described in each screen’s subsection.
Some screens will be automatically configured depending on your hardware and the type of media you used to start the installation. You can still change the detected settings in any screen. Screens which have not been automatically configured, and therefore require your attention before you begin the installation, are marked by an exclamation mark. You cannot start the actual installation process before you finish configuring these settings.
Installation can also be performed in text mode, however certain options, notably including custom partitioning, are unavailable. For more information, see Installing in Text Mode (x86) if using a AMD64/Intel 64 system or Installing in Text Mode (ppc) if using an IBM Power Systems server.
Remote Installation
You can use the graphical interface remotely to install CentOS. For headless systems,Connect Mode can be used to perform a graphical installation completely remotely. For systems with a display and keyboard, but without the capacity to run the graphical interface, Direct Mode can instead be used to facilitate setup. For more information, see the Using VNC.
Automated Installation
Anaconda installations can be automated through the use of a Kickstart file. Kickstart files can be used to configure any aspect of installation, allowing installation without user interaction, and can be used to easily automate installation of multiple instances of CentOS.In most situations, you can simply follow the procedure outlined in Automatic Installation to create and configure a Kickstart file, which can be used to perform an arbitrary number of non-interactive installations of CentOS.
Kickstart files can be automatically created based on choices made using the graphical or text mode interface, or written from scratch using any text editor. For more information, see Creating a Kickstart File.
Versions
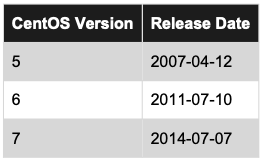
Examples
Let’s go through some detailed instructions on getting CentOS 7 installation and basic set up going.- Download the latest CentOS .ISO
- After downloading the last version of CentOS using the above links or using the official CentOS download page, burn it to a DVD or create a bootable USB stick using LiveUSB Creator called Unetbootin.
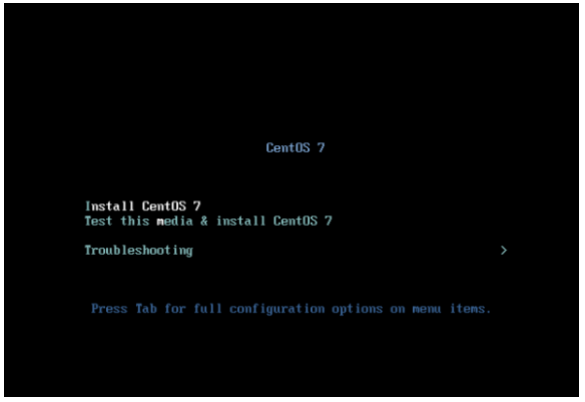
- After you have created the installer bootable media, place your DVD/USB into your system appropriate drive, start the computer, select your bootable unit, and the first CentOS 7 prompt should appear. At the prompt choose Install CentOS 7 and press the [Enter] key.
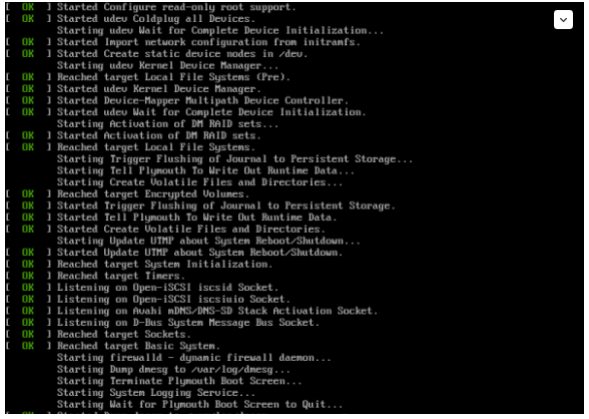
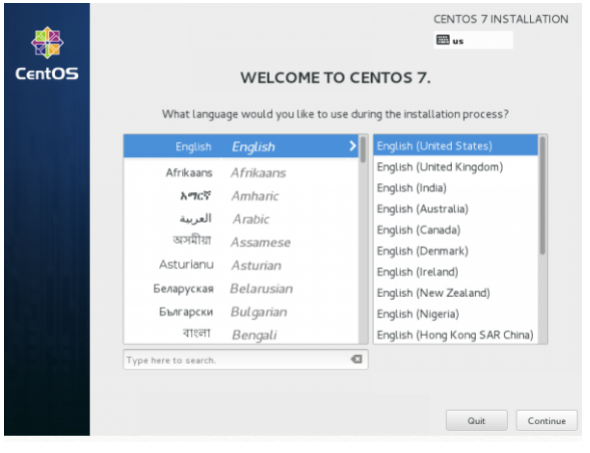
4. The system will start loading media installer and a Welcome screen should appear. Select your Installation Process Language — that will assist you through the entire installation procedure — and click on Continue.
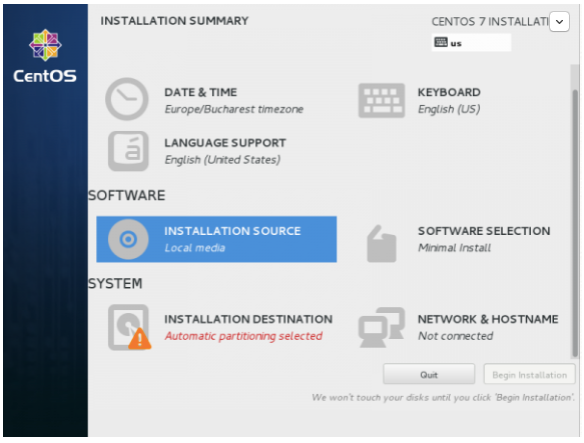
5. In the next step, the present screen prompt is Installation Summary. It contains a lot of options to fully customize your system. The first thing you may want to setup is your time settings. Click on Date & Time and select your server’s physical location from the provided map and hit the upper Done button to apply that configuration.
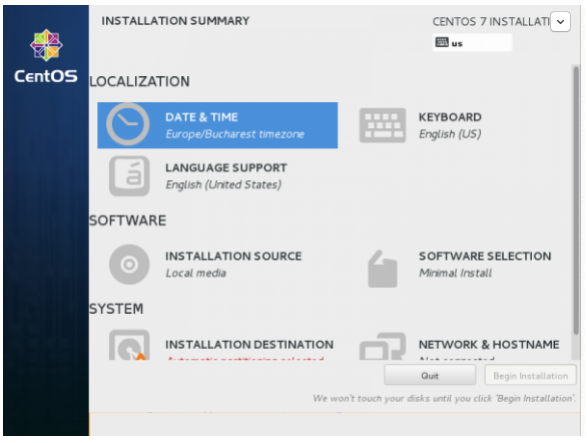
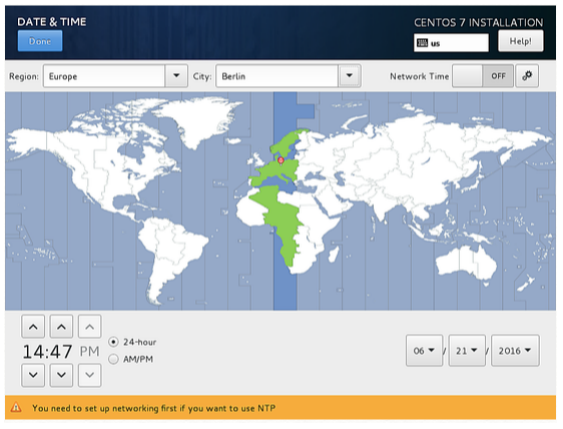
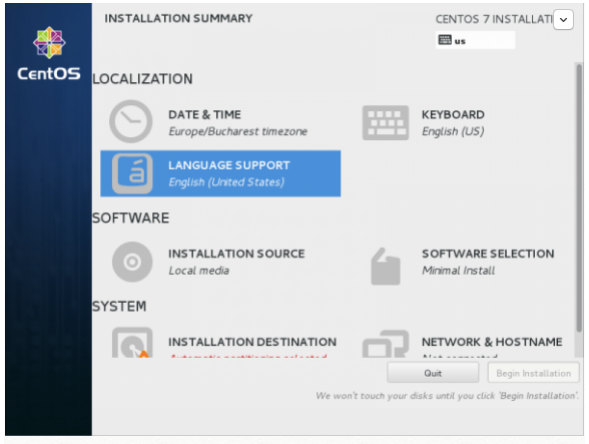
6. Next, choose your Language Support and Keyboard settings. Choose your main and extra language for your system, and when you’re finished, hit Done.

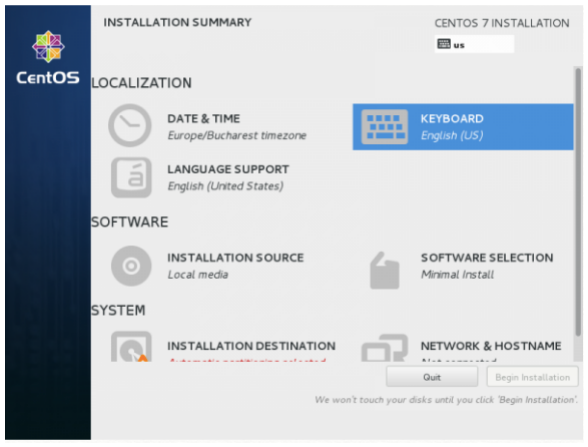
7. In the same way, choose your Keyboard Layout by hitting the plus button and test your keyboard configuration using the right input filed. After you’ve finish setting up your keyboard, you can use any key combination for switching between keyboards. In my case I am using Alt+Ctrl. After selecting your desired key combination, press Done again to apply changes and go back to the main screen on Installation Summary.
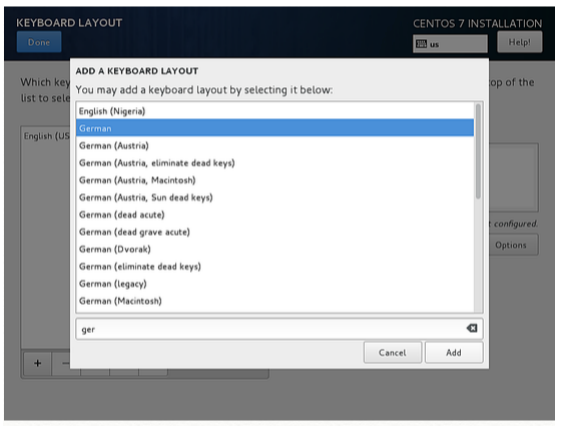
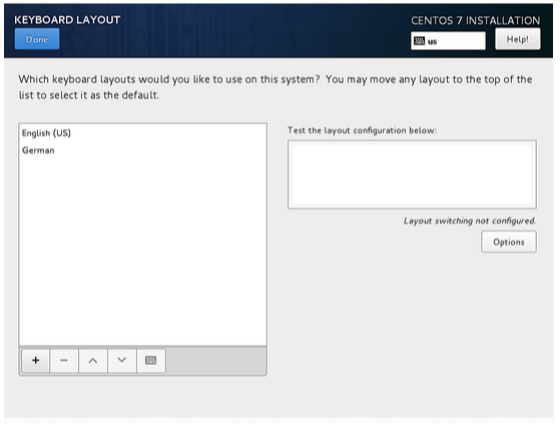
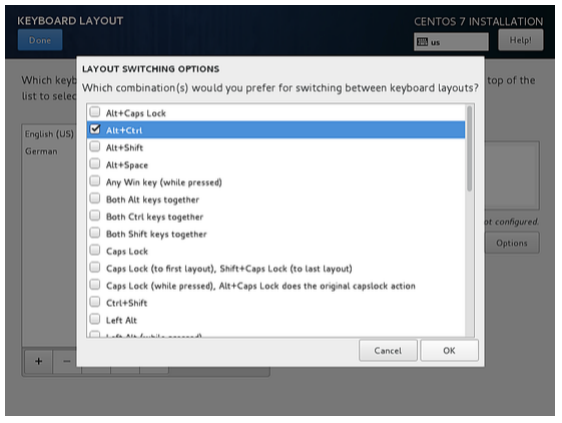
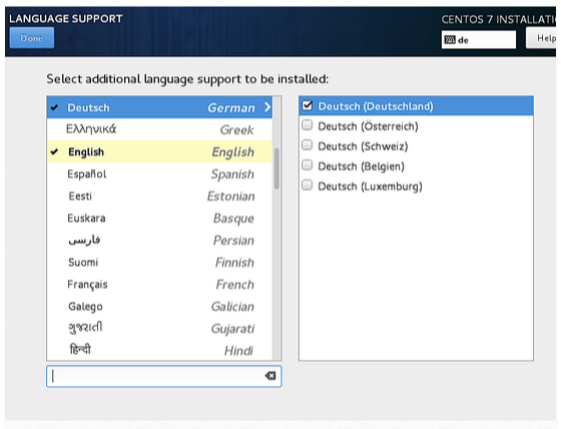
8. Now we can add LANGUAGE SUPPORT if you don’t want to use English. Click on “LANGUAGE SUPPORT” to open the dialog.
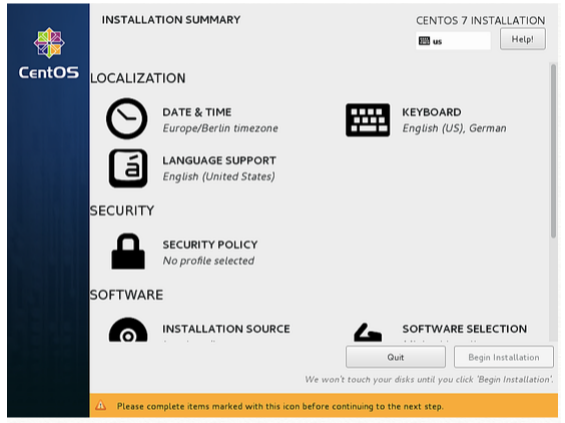
9. By default, CentOS comes with the English language preinstalled, but we can add more languages easily. In my case, I am adding Deutsch German with Deutsch (Deutschland) as the additional language. Press Done after your selection.
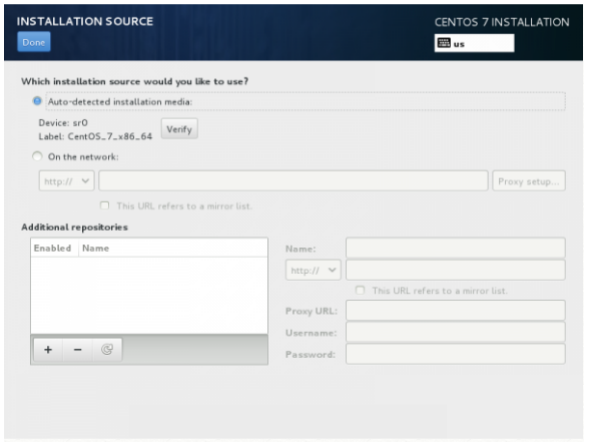
10. In the next step, you can customize your installation by using other Installation Sources than your local DVD/USB media, such as a network locations using HTTP, HTTPS, FTP or NFS protocols. You can even add some additional repositories, but use this method only if you know what you’re doing. So leave the default Auto-detected installation media and hit Done to continue.
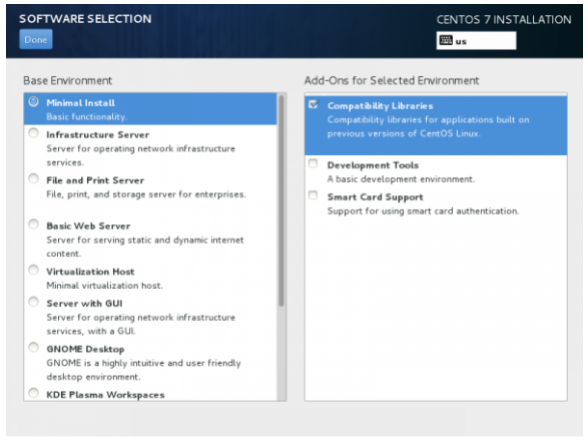
11. Next you can choose your system installation software. In this step, CentOS offers a lot of Server and Desktop platform environments that you can choose from. But if you want a high degree of customization, especially if you are going to use CentOS 7 to run as a server platform, then I suggest Minimal Install with Compatibility Libraries as Addons. This will install a minimal basic system software and later you can add other packages as your needs require using:

12. Now it’s time to partition your hard-drive. Click on Installation Destination menu, select your disk, and choose the one you want. I will configure partitioning. Read more about what partition to choose here.
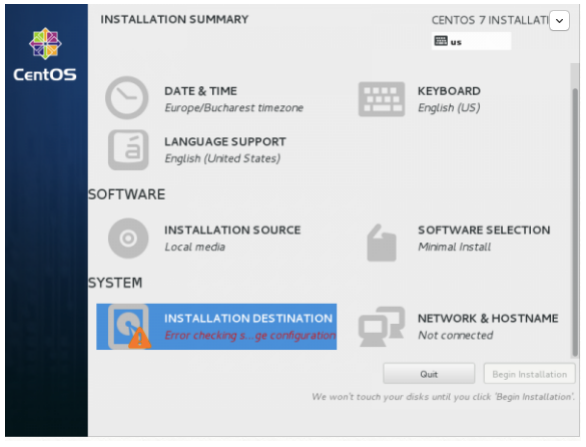
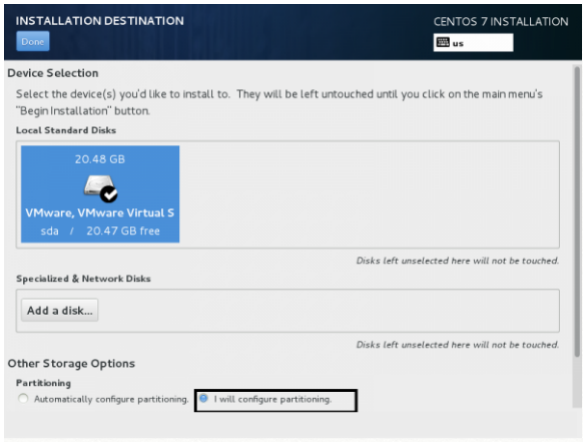
13. On the next screen, choose LVM (Logical Volume Manager) as partition layout and then click on Click here to create them automatically. This option will create three system partitions using XFS filesystem, automatically redistributing your hard-disk space and gathering all LVS into one big Volume Group named “centos”. 11.
- /boot — Non LVM
- /(root) — LVM
- Swap — LVM
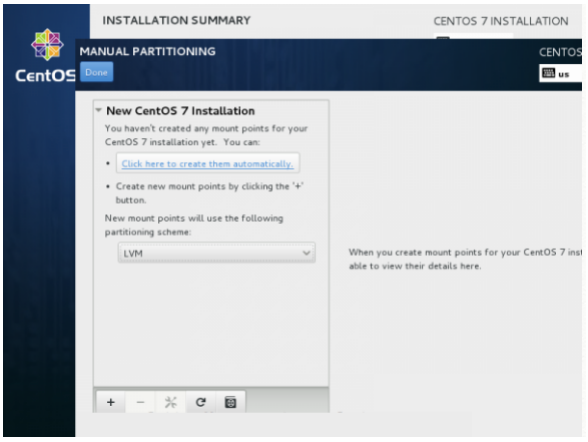
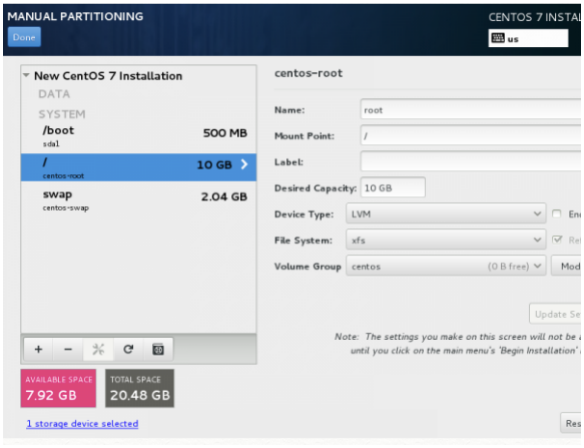
14. If you are not pleased with the default partition layout created automatically by the installer, you can completely add, modify, or resize your partition scheme. When you finish hit the Done button and Accept Changes on the Summary of Changes prompt.
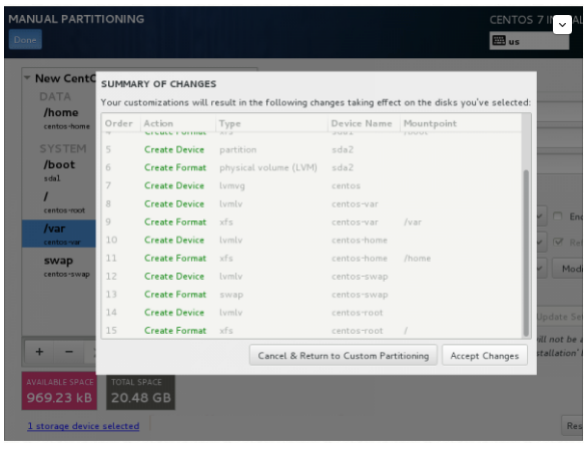
NOTE: For those users who have hard-disks more than 2TB in size, the installer automatically will convert the partition table to GPT. But if you wish to use GPT table on smaller disks than 2TB, then you should use the argument inst.gpt to the installer boot command line in order to change the default behavior.
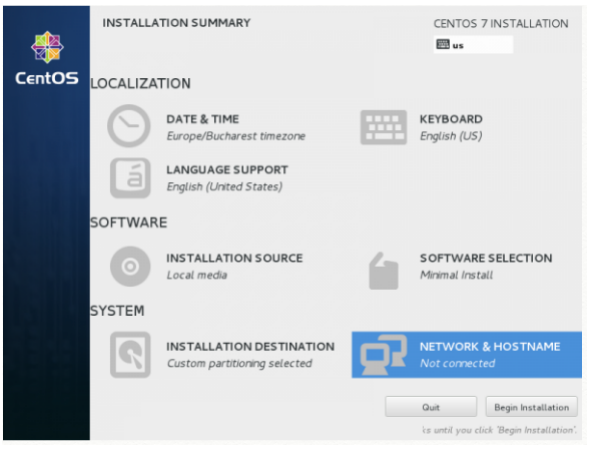
15. The next step is to set your system hostname and enable networking. Click on Network & Hostname label and type your system FQDN (Fully Qualified Domain Name) in the Hostname field, then enable your Network interface, switching the top Ethernet button to ON. If you have a functional DHCP server on your network, then it will automatically configure all your network settings for enabled NIC, which should appear under your active interface.
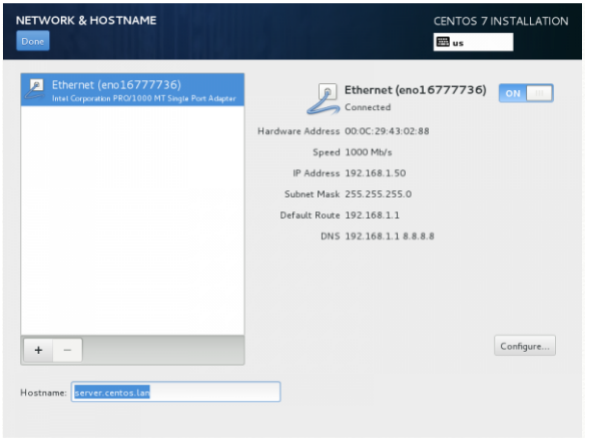
16. If your system is a server, it’s better to set static network configuration on Ethernet NIC by clicking on the Configure button and adding all your static interface settings like in the screenshot below. When you’re finished, hit Save, disable and enable the Ethernet card by switching the button to OFF and ON, and then hit Done to apply the settings and go back to the main menu.
Otherwise:
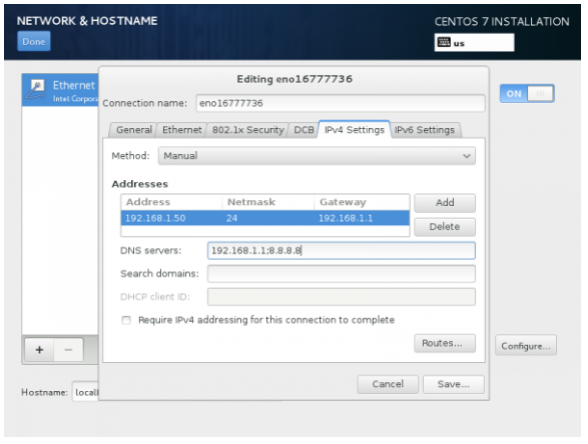
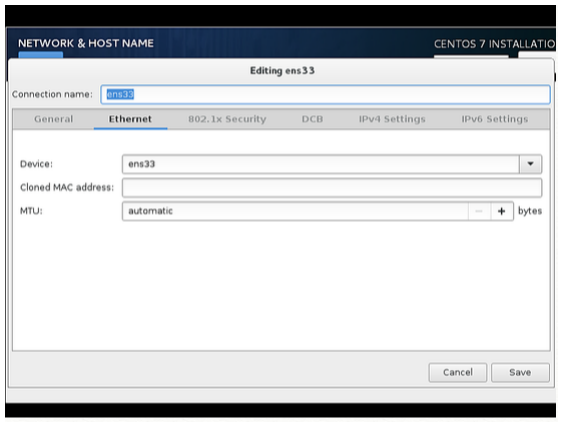
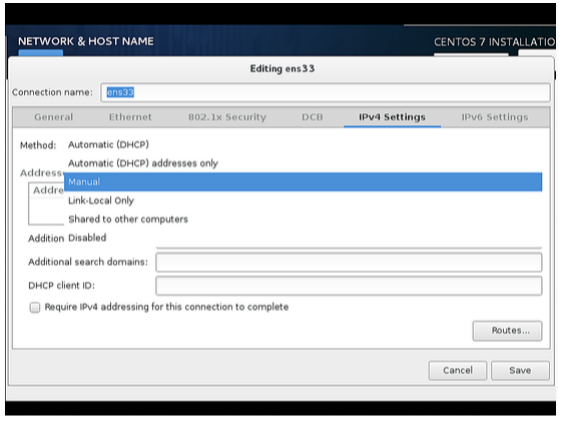
17. Add the entries for Address, Netmask and Gateway as per your static IP environment. In my case I am using the Address 192.168.1.100, Netmask 255.255.255.0, Gateway 192.168.1.1 and DNS servers 8.8.8.8 8.8.4.4. These values may vary according to your network environment. After that press Save.
IMPORTANT: If you do not have an IPv6 internet connection, then set IPv6 from auto to ignore on the IPv6 tab. Otherwise you won’t be able to reach the internet from this server on IPv4, as CentOS seems to ignore the correct IPv4 setup then and uses IPv6 instead which fails.
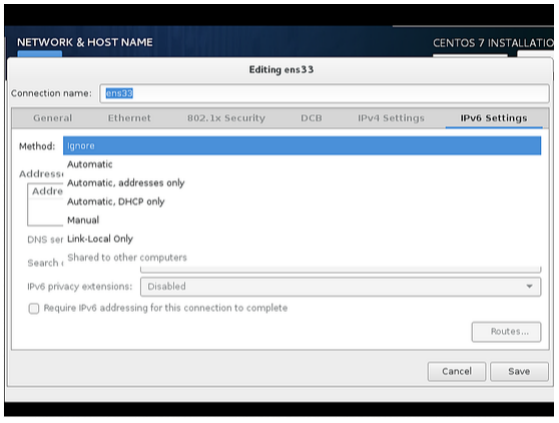
18. Next, we have to turn the connection ON as shown in the screenshot below. After, press Done.
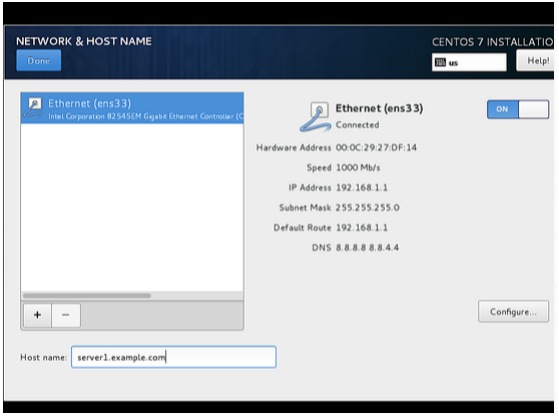
19. Now it’s time to start the installation process by choosing Begin Installation and setting up a strong password for the root account.
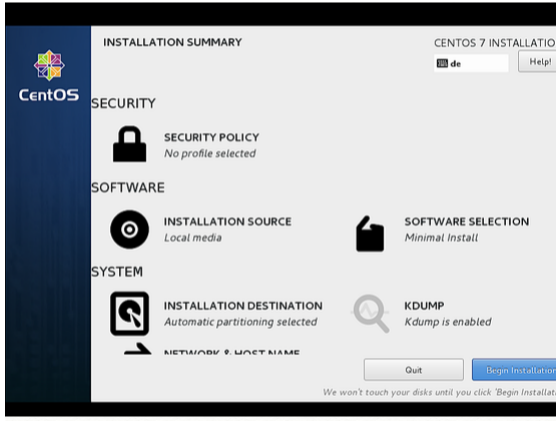
20. The installation process will start now and you will get a small blue progress bar in the next windows. Now we have to set the ROOT PASSWORD and add a new non-root user in the USER CREATION option. I will first go for root password.
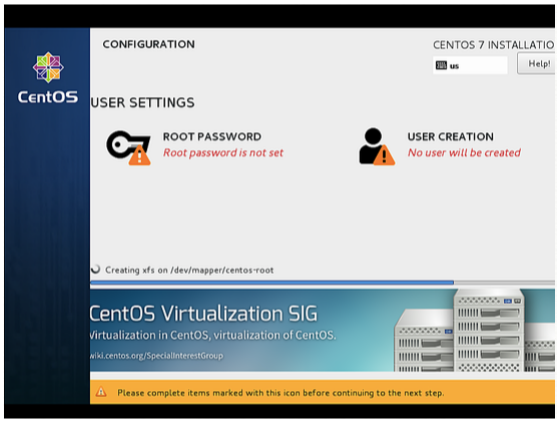
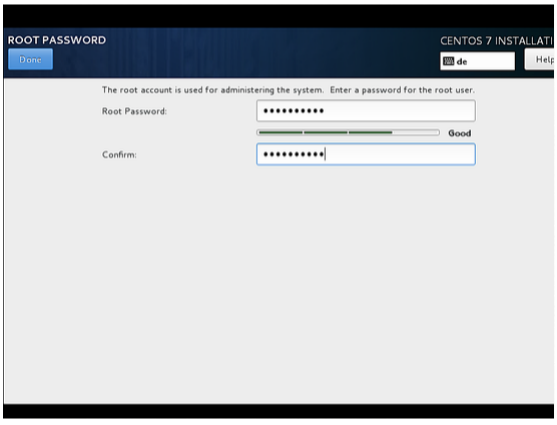
21. Enter a secure password of your choice and press Done.
22. Next we will go for USER CREATION.
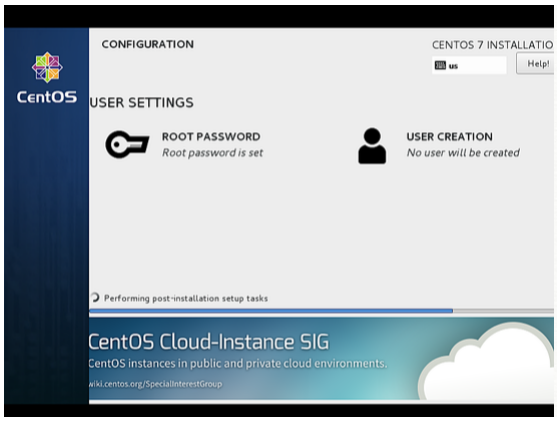
23. Next I will create a user. In my case I used the Full name “Administrator” and Username “administrator”. Check the option Require the password to use this account and then press Done. Of course you can use any value as per your choice.
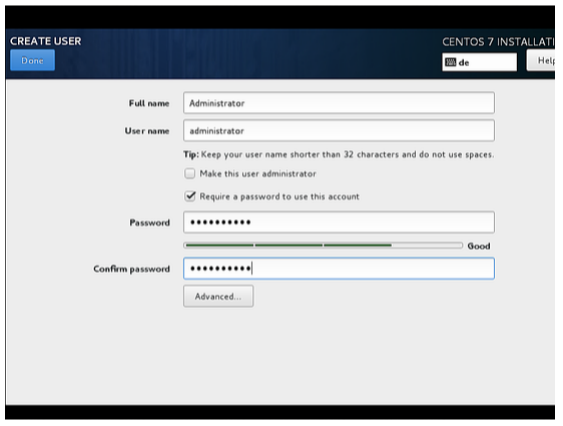
24. Press Finish. Have patience and wait for the completion of the setup.
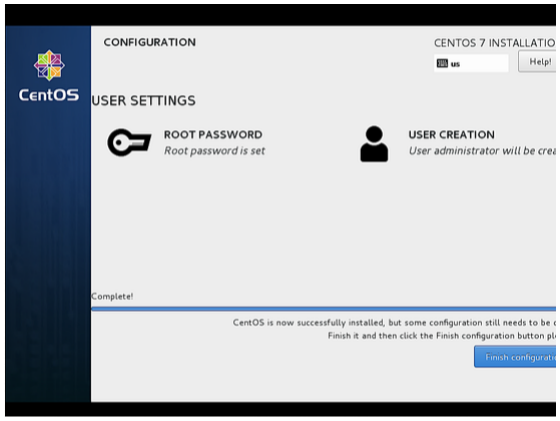
25. After completion of the installation, it will ask to reboot the server, just press Finish configuration.
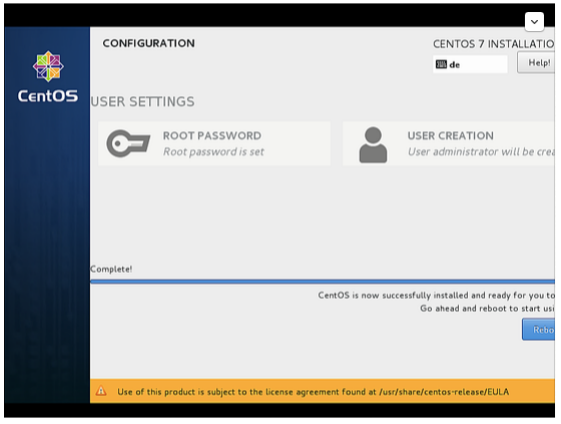
26. The server reboots and will request your username and password afterwards.
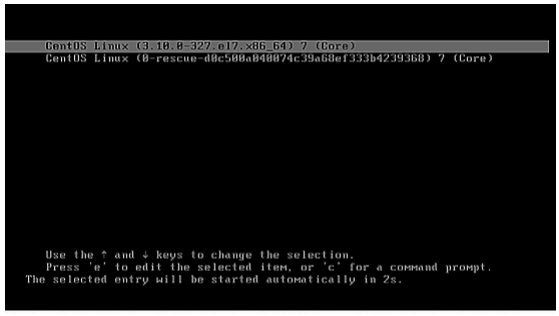
Congratulations! You have now installed last version of CentOS on your brand new machine. Remove any installation media and reboot your computer so you can login to your new minimal CentOS 7 environment and perform other system tasks, such as update you system and install other useful software needed to run day to day tasks.
Now we are ready to do login with the user that we just created above or we can use the root credentials.
First Login on CentOS. Login as root user to the server so we can do some final installation steps.
The first one is to install all available updates with yum.
Confirm with “y” to proceed with the installation of the updates. I will install two command line editors to be able to edit configuration files on the shell:
Network Configuration
CentOS 7.2 minimal don’t come pre-installed with the ifconfig command, so we will install it as follows:If you want to change or see the network configuration file, just edit the file:
It will be like this when you configured a static IP address:
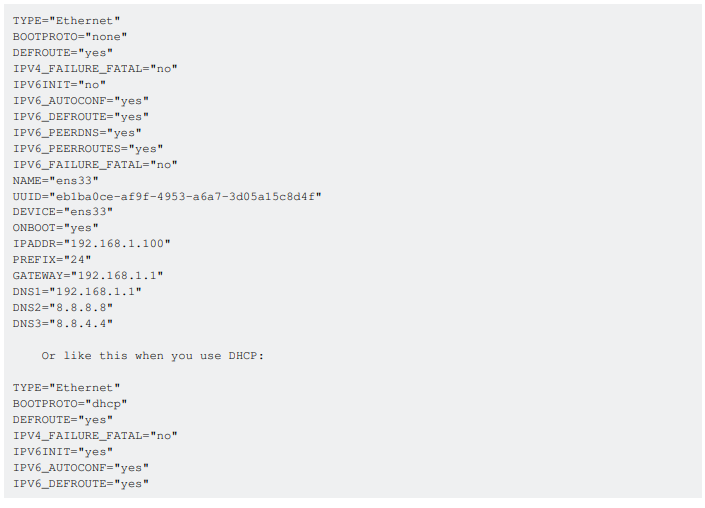

Change the values if required.
Note: The above DEVICE name may vary, so please check the equivalent file in the directory /etc/sysconfig/network-scripts.
Adjust /etc/hosts
Adjust the file /etc/hosts as follows:Make the values like this:

Congratulations! Now we have basic minimal CentOS 7 server setup.
Now you may prefer to use GUI instead, here is a variety of flavors you could choose from:
Installing GNOME-Desktop:
Install GNOME Desktop Environment by entering the following:To start the GUI, enter after finishing installation:
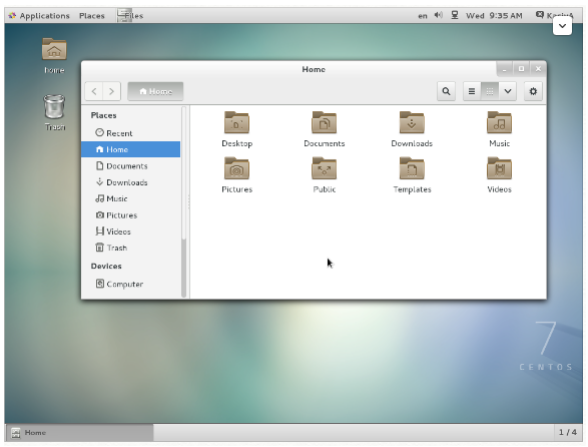
How to use GNOME Shell
The default GNOME Desktop of CentOS 7 starts with classic mode, but if you’d like to use GNOME Shell, set it like this:Option A: If you start GNOME with startx, set it like this:

Option B: set the system graphical login systemctl set-default graphical.target and reboot the system. After the system starts:
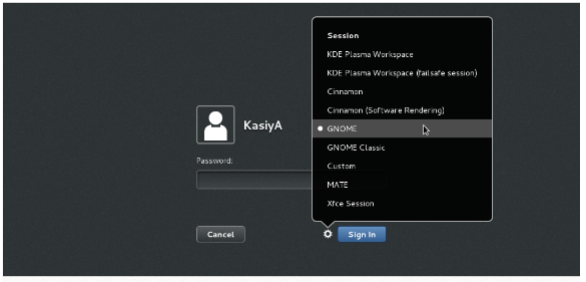
- Click the button which is located next to the “Sign In” button.
- Select “GNOME” on the list. (The default is GNOME Classic)
- Click “Sign In” and log in with GNOME Shell.
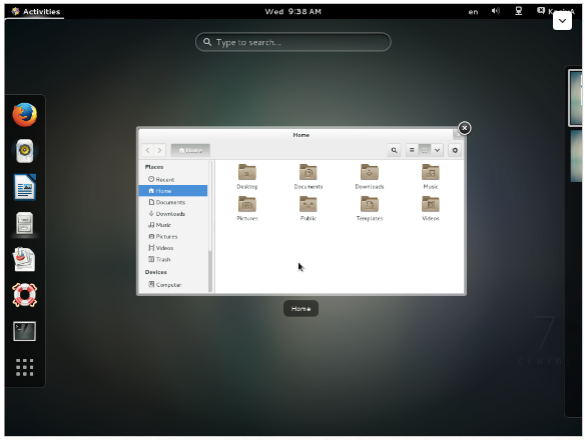
GNOME shell starts like this:
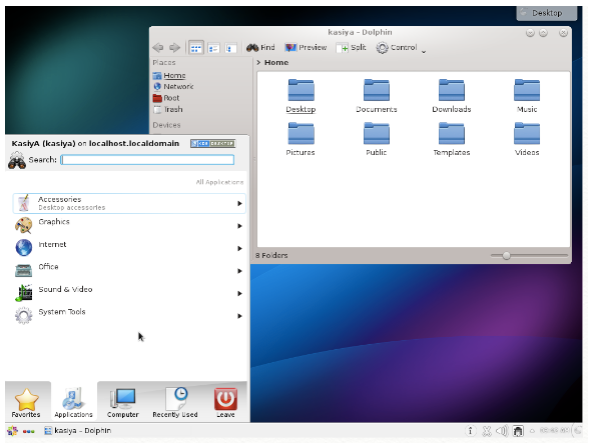
Installing KDE-Desktop:
Install KDE Desktop Environment by enteringInput a command like below after finishing the installation:

KDE Desktop Environment starts like this:
Installing MATE Desktop Environment:
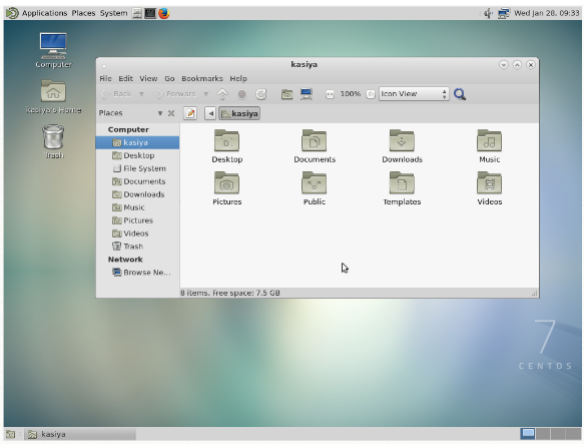
Install MATE Desktop Environment by entering this:Input a command like below after finishing the installation:

MATE Desktop Environment starts:
Installing Xfce Desktop Environment:
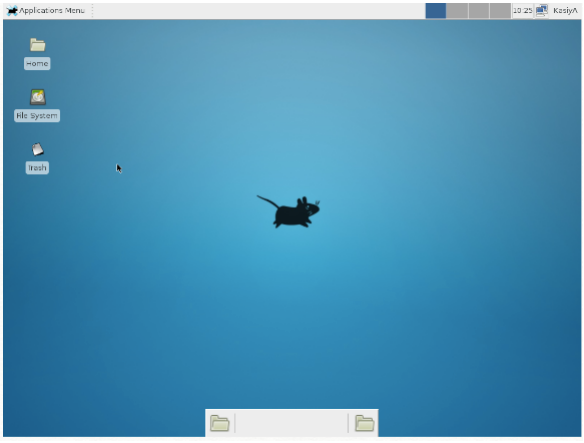
Install Xfce Desktop Environment by entering this:Input a command like below after finishing the installation:

Xfce Desktop Environment starts like this:
OTHER WAY TO DO IT:
Rather than make use of the hacking of a startx command into a .xinitrc file, it’s probably better to tell Systemd that you want to boot into a graphical GUI vs. the terminal.To accomplish this simply do the following:

Then simply reboot.
The last bit will associate the runlevel 5 target as your default with respect to Systemd.
Doing it with Systemd
You can also use Systemd to accomplish this. This is arguably the better method, since you’re managing the state of the system directly through Systemd and its CLIs.You can see what your current default target is:

And then change it to graphical:
Targets
In Systemd the targets runlevel5.target and graphical.target are identical. So too are runlevel2.target and multi-user.target.
RHEL / CentOS Linux Install Core Development Tools Automake, Gcc (C/C++), Perl, Python & Debuggers
Q. How do I install all developer tools such as GNU GCC C/C++ compilers, make and others, after installing CentOS or RHEL or Fedora Linux from a shell prompt?You need to install ‘Development Tools’ group on RHEL/CentOS/Fedora/Scientific/Red Hat Enterprise Linux. These tools include core development tools such as automake, gcc, perl, python, and debuggers which are required to compile software and build new rpms:
- flex
- gcc c/c++ compiler
- redhat-rpm-config
- strace
- rpm-build
- make
- pkgconfig
- gettext
- automake
- strace64
- gdb
- bison
- libtool
- autoconf
- gcc-c++ compiler
- binutils and all dependencies.
Installation:
Open the terminal or login over ssh session and type the following command as a root user:Sample outputs that follow:
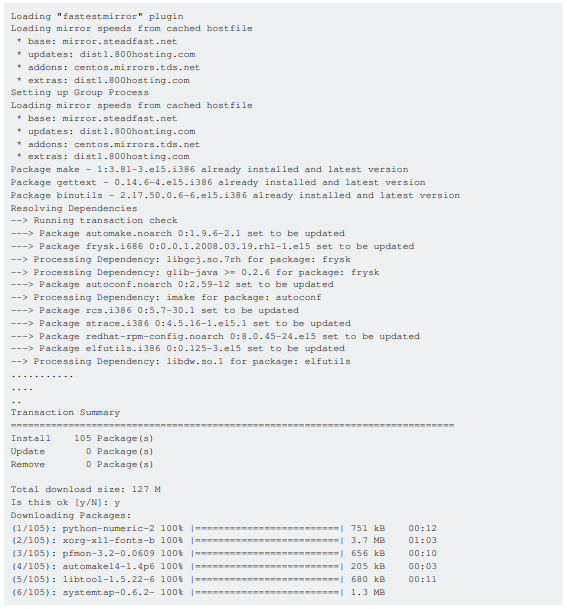
Now you can compile and use any application on your system.
Installation Verification
To display Gnu gcc/c/c++ compiler version type:Sample outputs:

How do I list all currently running services in Fedora / RHEL / CentOS Linux server?
There are various ways and tools to find and list all running services under Fedora / RHEL / CentOS Linux systems.The syntax is as follows for CentOS/RHEL 6.x and older (pre systemd):

Print the status of any service. To print the status of apache (httpd) service:
List all known services (configured via SysV):
List services and their open ports:
Turn on / off service:

ntsysv is a simple interface for configuring runlevel services which are also configurable through chkconfig. By default, it configures the current runlevel. Just type ntsysv and select the service you want to run.
A note about RHEL/CentOS 7.x with systemd
If you are using systemd based distro such as Fedora Linux v22/23/24 or RHEL/CentOS Linux 7.x+, try the following command to list running services using the systemctl command. It controls the systemd system and service manager.To list systemd services on CentOS/RHEL 7.x+ use the following.
The syntax is:

To list all services:
Sample outputs:
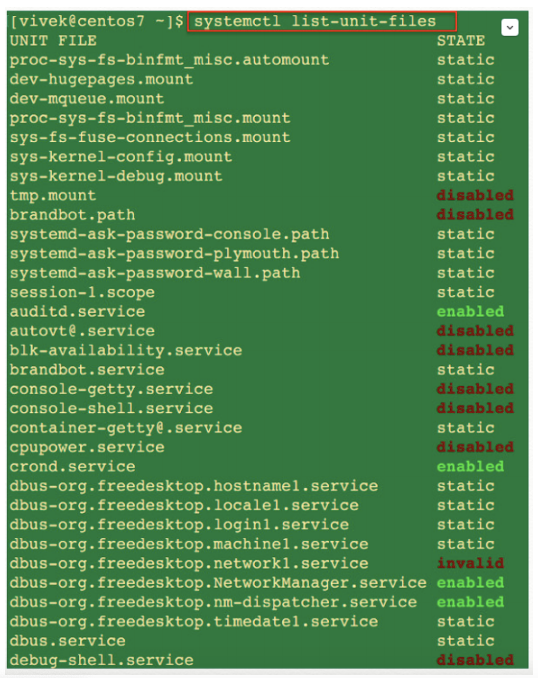
The above image shows List all units installed on the CentOS /RHEL 7 systemd based system, along with their current states.
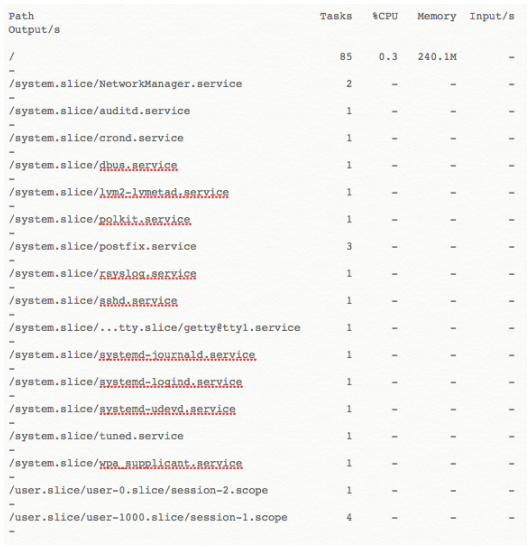
To view processes associated with a particular service (cgroup), you can use the systemd-cgtop command. Like the top command, systemd-cgtop lists running processes based on their services:
Sample outputs:
To list SysV services only on CentOS/RHEL 7.x+ use (does not include native systemd services):
Sample outputs:

FIREWALL HOW TO:
Learn how to set up the firewall here.References
- CentOS Documentation
- CentOS Release Notes
- Install Gnome GUI on CentOS 7 / RHEL 7
- Working with SYSTEMD Targets
CentOS version 7
CentOS 7 is fully based on RedHat’s detailed documentation. Examples and system administration guides are located here: CentOS 7 full documentation

Nice blog
ReplyDelete