
Ubuntu is an ancient African word meaning ‘humanity to others.’ It also means ‘I am what I am because of who we all are.'” — ubuntu.com
An early goal of Ubuntu has been to bring the spirit of humanity and community to the world of computers. This is emphasized somewhat less now that Canonical has shifted its focus in a more corporate direction, but Ubuntu users still share a deeply held belief that software should be freely accessible to everyone regardless of language, disability, or income.
Ubuntu (pronounced "oo-boon-too") is one of the most popular desktop Linux operating systems. The term Ubuntu derives from South Africa and roughly translates to "humanity toward others." The name is a nod to the Ubuntu project's commitment to the principles of open-source software development. It is free to install and free to modify, although donations to the project are welcome.
Ubuntu (pronounced "oo-boon-too") is one of the most popular desktop Linux operating systems. The term Ubuntu derives from South Africa and roughly translates to "humanity toward others." The name is a nod to the Ubuntu project's commitment to the principles of open-source software development. It is free to install and free to modify, although donations to the project are welcome.
What is Ubuntu?
Ubuntu is a Debian-based Linux operating system that runs from the desktop to the cloud, to all your internet connected things. It is the world's most popular operating system across public clouds and OpenStack clouds. It is the number one platform for containers; from Docker to Kubernetes to LXD, Ubuntu can run your containers at scale. Fast, secure and simple, Ubuntu powers millions of PCs worldwide.
Development of Ubuntu is led by Canonical Ltd. Canonical generates revenue through the sale of technical support and other services related to Ubuntu. The Ubuntu project is publicly committed to the principles of open-source software development; people are encouraged to use free software, study how it works, improve upon it, and distribute it.
Development of Ubuntu is led by Canonical Ltd. Canonical generates revenue through the sale of technical support and other services related to Ubuntu. The Ubuntu project is publicly committed to the principles of open-source software development; people are encouraged to use free software, study how it works, improve upon it, and distribute it.
What Is Ubuntu?
Ubuntu is a free desktop operating system. It’s based on Linux, a massive project that enables millions of people around the world to run machines powered by free and open software on all kinds of devices. Linux comes in many shapes and sizes, with Ubuntu being the most popular iteration on desktops and laptops.
When I say “free,” I’m not just referring to cost. I’m also talking about freedom. Unlike most proprietary software (such as Windows and macOS), free and open source software lets you edit its code, install as many copies as you want, and distribute the program as you please. You don’t pay for a license to use it. So Ubuntu is not only free for you to download.
When I say “free,” I’m not just referring to cost. I’m also talking about freedom. Unlike most proprietary software (such as Windows and macOS), free and open source software lets you edit its code, install as many copies as you want, and distribute the program as you please. You don’t pay for a license to use it. So Ubuntu is not only free for you to download.
Canonical has released its non-LTS Ubuntu 19.04 Operating system for Desktop and Servers on 18th April 2019, Code name for Ubuntu 19.04 is “Disco Dingo”. As it is non-LTS release, so we will get latest packages and patches for next 9 months (January 2020) from canonical.
In this article we will demonstrate how to install Ubuntu 19.04 on your laptop or desktop with customize partitions scheme. There are number new features and enhancements noticed in this release, some of them are listed below:
In this article we will demonstrate how to install Ubuntu 19.04 on your laptop or desktop with customize partitions scheme. There are number new features and enhancements noticed in this release, some of them are listed below:
- New Linux Kernel version 5.0
- Improved GNOME 3.32 Desktop
- Kernel Live patching for Desktop Users
- Improved Audio Settings
- Introduction of Mesa 19.0 (Graphics Library)
- Updated Packages like OpenJDK 11, Python 3.7.3, Perl 5.28.1 ruby 2.5.5 and php 7.2.15 etc.
- LibreOffice 6.6.2
Minimum System Requirement for Ubuntu 19.04:
- 2 GB RAM
- Dual Core Processor (2GHz Speed)
- 20 GB free hard disk space
- Bootable Media like USB or DVD
- Internet Access (optional but recommended)
Step:1) Download and Burn Ubuntu 19.04 ISO file
Download Ubuntu 19.04 (64-bit) ISO file from its official site:https://www.ubuntu.com/download/desktop
Once you have downloaded the ISO file then burn it either into USB drive or DVD and make it bootable.
Reboot your target desktop or laptop on which you want to install Ubuntu 19.04 and go to its bios settings and change the boot medium as “USB Drive/ DVD”
Step:2) Choose Install Ubuntu
When you boot your laptop or desktop with above created bootable media then you will be getting the following screenChoose “Install Ubuntu”
Step:2) Select your keyboard layout
Choose your keyboard layout which suits to your language,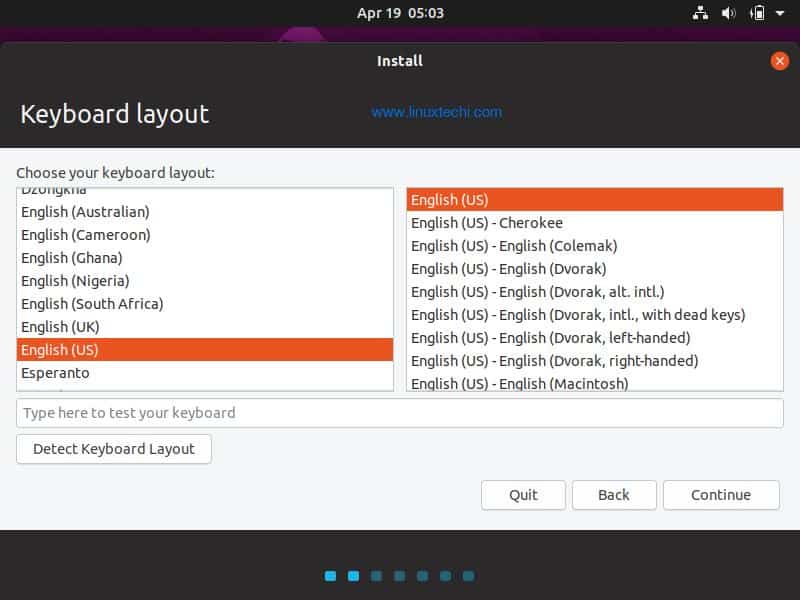
Click on Continue
Step:3) Prepare to Install Ubuntu and third-party software
Choose how you want to start Ubuntu 19.04 installation, there two options,- Normal Installation
- Minimal Installation
If your system is connected to internet and you want to install updates and third-party software, then choose below options or else untick these options
- Download updates while installing Ubuntu
- Install third-party software for Graphics and WiFi…
Click on Continue to proceed further
Step:4) Choose Your Installation Type
In this step you have to choose your Ubuntu 19.04 installation type, Installation type can be of following types,- Erase Disk and Install Ubuntu (Delete all data from disk and will create partitions automatically)
- Encrypt the new Ubuntu installation for security (If want to encrypt your hard drive for Ubuntu 19.04 then choose this option)
- Use LVM with the new Ubuntu installation (If you are planning to have LVM based partitions then choose this option)
- Something Else (If you want to create your own partitions scheme then choose this option)
In the Next window, you will get how much hard disk is available for Ubuntu 19.04 installation, in my case I have around 42 GB disk space, so I will be creating beneath partitions on it,
- /boot = 2GB (ext4 file system)
- /home = 16 GB (ext4 file system)
- /var = 10 GB (ext4 file system)
- / = 12 GB (ext4 file system)
- Swap = 1.7 GB
Let’s create our first partition as /boot of size 2 GB, Select the free disk and then click on + symbol and then specify partition mount point as /boot and file system as ext4
Click on OK to create further partitions,
Create /home partition of size 16 GB,

Similarly create /var and / partition of size 10 GB and 12 GB respectively,
Click on OK to create proceed further
Now create our last partition as swap of size 1.7 GB,
Click on OK
In the Next window click on “Install Now” option and then click on continue to write changes to the disk
Step:5) Choose Your Time Zone
Select your time zone which suits to your installation and then click on ContinueStep:6) Specify User Name & its password and set Hostname
In this step specify the user name & its password and hostname for your Ubuntu 19.04.We will use the same user name and password to login to the system once installation is completed.Click on Continue to proceed with installation
Step:7) Ubuntu 19.04 Installation Started
As we can see installation has been started and is in progressOnce the installation is completed then installer will prompt you to restart your system
Click on “Restart Now” to reboot your system.
After reboot, make sure you change the boot medium from Bios settings so that your system boots up the hard disk.
Step:8) Login Screen and desktop of your Ubuntu 19.04
After the reboot you will be below login screen, use the same user name and password that we have created during the installationAfter login you will get the window to configure your online accounts like Google, Nextcloud and Microsoft etc, if you don’t want to configure it right now then you can skip this.
This confirms that we have successfully installed Ubuntu 19.04 on our laptop / Desktop. Please share your feedback and comments if these steps help you to install Ubuntu 19.04 on your system.
Basic Ubuntu Commands for Beginner:
Note: Each command has its own additional parameters to extend its functionality but in this article, we won’t go into that much detail. Consider it to be a basic introduction to the basic Ubuntu commands.1. mkdir (Make Directory)
One of the common actions that you may want to take is to create a new folder or even go a step further to create a subfolder. To perform these functions, you will have to use the mkdir command and type the name of the folder after it.
Example:
root@server:/# mkdir test This command will create test directory at the root directory of your server.
2. ls (List)
ls command stands for list. You will use it whenever you want to see everything that is in your directory. It will display all the files and folders that exist in the current directory that you have opened. To use it, just type the directory name then follow it up with the ls.
Example:
root@server:~# ls This command will list all the files and folders that are in the server’s root directory
sys/ test/ tmp/ usr/ var/ 3. cd (Change Directory)
cd is a command for changing a directory in the terminal. It is one of the basic Ubuntu commands that you cannot avoid, no matter what. To use it, you simply need to type the name of the folder that you want to move to.
Example:
root@server:~# cd /test now you’re inside test directory
root@server:/test# Basic commands to remember:
root@server:~# cd /this will open the root directory.root@server:~# cd ..open one level up directory.root@server:~# cd -will open the home directory
This is the most obvious command, whether you are a newbie or not. It stands for copy-and-paste. It will come handy when you want to organize your files on the computer. To use it, you need to know the file name and the target destination where you will paste it. If the file that you want to copy and paste requires permission from the root, then you will have to use the des command.
Example:
root@server:/test# cp t1/* t2 This command will copy all the files from t1 folder into folder t2.
5. sudo (SuperUserDo)
This command stands for SuperUserDo. It is also a basic and an essential command for the Ubuntu newbies. You will always use it when typing other commands that require to gain permission from the root (if you are not a root user). You simply need to place this command before the command that you want to execute with root permission.
Example:
vicky@server:~$ sudo service apache2 restart This command will let you restart the web server with root permission. However, you’ll have to enter your password for once.
6. rm (Remove)
The rm command is used for removing files and directories from their current location. You should use -f if the file requires permission from the root and -r if you want to perform a recursive removal of the folder.
Example:
root@server:/test# rm -rf t2 This command will delete the t2 directory and all its content from the test directory.
7. find (find)
Sometimes you may need to use a file but you can’t find its exact location or remember its path, use the find command. It will help you to find that file with ease. You only need to type this command then add some keywords about the file.
Example:
root@server:/test# find t1
t1
t1/xd.p
As you can see it found everything related to t2 in the test directory
8. poweroff (Poweroff computer)
This command lets you switch the computer using the Ubuntu terminal. It is an ideal option for turning a computer off without using the mechanical method. if you are not a root user, you should type sudo command before typing poweroff.
Example:
root@server:/test# poweroff and the system will shut down
9. Cat (concatenate)
One of the common things that you may intend to do is to inspect texts and codes in your script. The cat command is used for viewing those texts and even codes that are in a particular file that you have opened.
Example:
root@server:/test/t1# cat hello.txt Hi, This is for testing only The above command is showing the text that was inside the hello.txt file.
10. Pwd
When using Ubuntu, it is always prudent to the current directory that you are working on. This will help you to know where you will go next. pwd is the best command for doing this job. It will print your current directory.
Example:
root@server:/test/t1# pwd
/test/t1
the above command is showing the directory in which you are right now.
11. mv (Move/rename)
You will need this command whenever you want to move your file to a different location or give it a different name. When it comes to renaming, you need to type both the old and the new name. Remember to start with the des command for files that require permission from the root.
Example:
root@server:/test# mv t1/* t2
root@server:/test# mv t2 test2
root@server:/test# ls
t1 test2
In the above example first command will move all the files from t1 to t2 and the next command will change the name of t2 folder to test2
12. rmdir (Remove directory)
Apart from removing files, you may also need to remove a directory. This is the command for doing this job. If you want to remove a directory named t1, just type “rmdir t1”.
Example:
root@server:/test# ls
t1 test2
root@server:/test# rmdir t1
root@server:/test# ls
test2
The command rmdir t1 successfully deleted the directory t1 from test directory.
13. touch (Create blank file)
The touch command is used for creating blank files in the Ubuntu terminal. It can be compared to the mkdir command for directories. You can use it to create a file in any directory that you want.
Example:
root@server:/test/test2# touch empty.txt
root@server:/test/test2# ls
empty.txt hello.txt
The above command has created an empty text file named empty.txt under test2 directory.
14. apt-get (Download, install, and update software)
You will need this command when you are trying to install a software that you want to run in your Ubuntu PC. Apart from the installation, you will need this tool when upgrading and uninstalling your software. Since most of these actions will require to get permission from the root, you will always have to start by typing the sudo command.
Example:
root@server:/# apt-get install apache2 This command will install apache web server on your ubuntu os. you can also use apt-get command to update the system.
root@server:/# apt-get update 15. free (check free ram)
You can use this command to check the amount of free and used RAM in your computer.
Example:
root@server:/test/test2# free
total  used  free shared buff/cache available
2097152 598076 1417768 232288 81308 1424127
The above command showing how much ram is being used and available.
16. df (Disk space)
As a normal computer user, it is prudent to check the disk space that is available in your operating system. df is the command for checking disk usage in your Ubuntu. It is usually used along the -h parameter.
Example:
root@server:/test# df -h
Filesystem Size Used Avail Use% Mounted on
/dev/simfs 95G  2.3G  93G  3%   /
devtmpfs   1.0G 0     1.0G 0%   /dev
tmpfs      1.0G 0     1.0G 0%  /dev/shm
tmpfs      1.0G 99M   926M 10%  /run
tmpfs      5.0M  0    5.0M 0%  /run/lock
tmpfs      1.0G  0    1.0G 0%  /sys/fs/cgroup
none       1.0G  0    1.0G 0% /run/shm
The above command shows which file system is having how much disk space, how much is available and where it is mounted.
17. Chmod (Change Permission)
chmod is an important command that you can use to change file and directory permissions. These permissions include read, write and execute. You need to type chmod, followed by the specific permission then the filename or folder.
Example:
root@server:/test# chmod 755 test2 This command will grant Read + write + execute permission to the User and read + execute permission to the group and everyone else. Learn more about file permissions here.
18. du (Directory usage)
du command displays the size of a directory and all of its subdirectories.
Example:
root@server:/test# du
8  ./test2
12 .
19. service (Run System V init scripts)
Service command is very useful command for running, stopping or restarting System V init scripts that are stored inside/etc/init.d directory.
Example:
root@server:~# service apache2 restart This command will successfully restart your apache server.
20. <command name> -–help
This command will provide you all the details about the command you are running and the parameters associated with it
Example:
root@server:/test# mv --help
Usage: mv [OPTION]... [-T] SOURCE DEST
or: mv [OPTION]... SOURCE... DIRECTORY
or: mv [OPTION]... -t DIRECTORY SOURCE...
Rename SOURCE to DEST, or move SOURCE(s) to DIRECTORY.
..
This above commands explain the working of mv command and list all the parameters associated with it.