
🛒 Recommended gear on Amazon
Disclosure: some links above are affiliate links — if you buy through them I may earn a small commission at no extra cost to you. Thanks for supporting the channel!
command line tool and library
for transferring data with URLs
for transferring data with URLs
Supports...
DICT, FILE, FTP, FTPS, Gopher, HTTP, HTTPS, IMAP, IMAPS, LDAP, LDAPS, MQTT, POP3, POP3S, RTMP, RTMPS, RTSP, SCP, SFTP, SMB, SMBS, SMTP, SMTPS, Telnet and TFTP. curl supports SSL certificates, HTTP POST, HTTP PUT, FTP uploading, HTTP form based upload, proxies, HTTP/2, HTTP/3, cookies, user+password authentication (Basic, Plain, Digest, CRAM-MD5, NTLM, Negotiate and Kerberos), file transfer resume, proxy tunneling and more.
What's curl used for?
curl is used in command lines or scripts to transfer data. It is also used in cars, television sets, routers, printers, audio equipment, mobile phones, tablets, settop boxes, media players and is the internet transfer backbone for thousands of software applications affecting billions of humans daily.
Who makes curl?
curl is free and open source software and exists thanks to thousands of contributors and our awesome sponsors. The curl project follows well established open source best practices. You too can help us improve!
What's the latest curl?
The most recent stable version is 7.70.0, released on 29th of April 2020. Currently, 85 of the listed downloads are of the latest version.
Where's the code?
Check out the latest source code from github.
Install cURL
Linux
Most Linux distributions have cURL installed by default. To check whether it is installed on your system or not, type
curl in your terminal window and press enter. If it isn’t installed, it will show a “command not found” error. Use the commands below to install it on your system.For Ubuntu/Debian based systems use:
sudo apt update
sudo apt install curl
For CentOS/RHEL systems, use:
sudo yum install curl
On the other hand, for Fedora systems, you can use the command:
sudo dnf install curl
MacOS
MacOS comes with cURL preinstalled, and it receives updates whenever Apple releases updates for the OS. However, in case you want to install the most recent version of cURL, you can install the
curl Homebrew package. Once you install Homebrew, you can install it with:brew install curl
Windows
For Windows 10 version 1803 and above, cURL now ships by default in the Command Prompt, so you can use it directly from there. For older versions of Windows, the cURL project has Windows binaries. Once you download the ZIP file and extract it, you will find a folder named
curl-<version number>-mingw. Move this folder into a directory of your choice. In this article, we will assume our folder is named curl-7.62.0-win64-mingw, and we have moved it under C:\.Next, you should add cURL’s
bin directory to the Windows PATH environment variable, so that Windows can find it when you type curl in the command prompt. For this to work, you need to follow these steps:- Open the “Advanced System Properties” dialog by running
systempropertiesadvancedfrom the Windows Run dialog (Windows key + R). - Click on the “Environment Variables” button.
- Double-click on “Path” from the “System variables” section, and add the path
C:\curl-7.62.0-win64-mingw\bin. For Windows 10, you can do this with the “New” button on the right. On older versions of Windows, you can type in;C:\curl-7.62.0-win64-mingw\bin(notice the semicolon at the beginning) at the end of the “Value” text box.
Once you complete the above steps, you can type
curl to check if this is working. If everything went well, you should see the following output:C:\Users\Administrator>curl
curl: try 'curl --help' or 'curl --manual' for more information
cURL basic usage
The basic syntax of using cURL is simply:
curl <url>
This fetches the content available at the given URL, and prints it onto the terminal. For example, if you run
curl example.com, you should be able to see the HTML page printed, as shown below: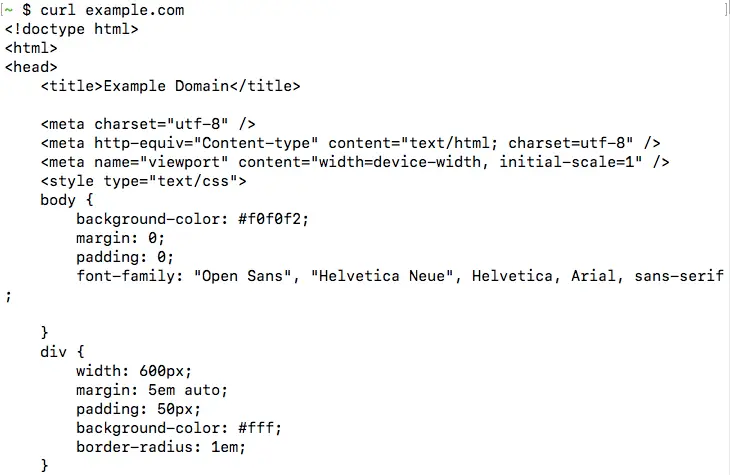
This is the most basic operation cURL can perform. In the next few sections, we will look into the various command line options accepted by cURL.
Usecases:
- No browser access
- Inside a shell script
- To test the output of an API
I have mostly used curl for the last use case. I have been using this quite frequently these days, sometimes just copy-pasting commands I found online. I want to take a moment and understand its features better, to use it in its full potential and so here I am to share some interesting things about curl that I came across.
Commands:
1) Requesting a page:
If no argument is explicitly passed, curl command invokes an HTTP get and displays the static content of the page similar to the view page source option in a browser.
curl
2) Download a file:
There are two options available to download and save a file
- Download a file and save it with the same name (testfile.tar.gz)
curl -O
- Download a file and save it with a custom name
curl -o custom_file.tar.gz
- Download multiple files in the same curl command, although the official documentation doesn’t recommend this
curl -O -O
3) Get HTTP headers:
If you are curious to know what headers are included on the server, you can use the
-I or the — head option. It allows to only fetch the headers of a document from the server.curl -I
HTTP/1.1 200 OK
Content-Type: text/html; charset=ISO-8859-1
P3P: CP="This is not a P3P policy! See g.co/p3phelp for more info."
Date: Thu, 04 Jun 2020 15:07:42 GMT
Server: gws
X-XSS-Protection: 0
X-Frame-Options: SAMEORIGIN
Transfer-Encoding: chunked
Expires: Thu, 04 Jun 2020 15:07:42 GMT
Cache-Control: private
Set-Cookie: 1P_JAR=2020-06-04-15; expires=Sat, 04-Jul-2020 15:07:42 GMT; path=/; domain=.google.com; Secure
Set-Cookie: <cookie_info>
4) Ignore invalid or self-signed certificates:
Often when you are testing an API endpoint that is running on your testing instance, you may have a self-signed certificate or an invalid one. Every SSL connection that curl makes is verified by default. To not let curl verify the validity of the SSL certificate and establish an insecure connection for testing, the
-k or --insecure option can be usedcurl -k
5) Make a POST request:
Sometimes when testing an API, you need to send some parameters to it, especially when making a POST request. When using curl to test a POST request, the data can either be a JSON or a name-value pair
curl --data "param1=test1¶m2=test2"
Or like a regular JSON:
curl --data '{"param1":"test1","param2":"test2"}' \http://www.test.com
Using –data is equivalent to using -d, both of these imply that the curl request made is an HTTP post
6) Specify the type of request:
By default curl makes an HTTP get request unless some data is being passed to it. If you want to just update a record instead of recreating, curl has an option that comes in handy for this. The
-X or —-request option lets you specify the type of HTTP request method to use when communicating with the server.# updating the value of param2 to be test 3 on the record id
curl -X 'PUT' -d '{"param1":"test1","param2":"test3"}' \http://test.com/1
7) Include the Basic Auth:
If an API endpoint is behind authentication, which usually is the case, you can pass in the credentials when making the request using the
-u or -user option. If you simply specify the user name, curl prompts for the password. If this option is used several times, only the last one is passed to the server for authentication.curl -u <user:password>
8) Update name resolution:
If you want to test an API before deploying and want to hit in the endpoint in the test machine rather than the actual endpoint, you can pass in a custom resolution for that request. Think of it as an equivalent to
/etc/hosts host-resolutioncurl --resolve www.test.com:80:localhost http://www.test.com/
9) Upload a file:
Uploading a file through curl is something I got to know about pretty recently. I wasn’t sure if this was possible but apparently, it is. curl with the
-F option emulates a filled-in form when the user has clicked the submit button. This option causes curl to POST data using the Content-Type multipart/form-datacurl -F @field_name=@path/to/local_file <upload_URL>
You can upload multiple files by repeating the same parameter with the file to upload multiple times
curl -F @field_name=@path/to/local_file @field_name=@path/to/local_file_2 <upload_URL>
10) Timing Curl connection:
You can pass in the
-w option to curl to display information on stdout after a transfer is complete. There are a set of variables that are supported by the -w option, the most interesting options are to get the total time it took for a request to be successful. This comes in handy for timing any uploads or downloads made with curl.curl -w "%{time_total}\n" -o /dev/null -s www.test.com
GET request
To make a simple GET request, all one needs to do is use
curl + the website URL. For example, curl will yield the following results:
You may also pass additional items along with your GET request. For example, if a website has protected content
curl allows you to pass authentication credentials. To do so use the following syntax:curl --user "USERNAME:PASSWORD" https ://www.domain.com.“USERNAME” must be replaced with your actual username in quotes. If you do not want to include your password in your command line history, you may simply use the following request:
curl --user "USERNAME", and you will be prompted for your login credentials.POST request
In the case of my code challenge it was important that my RESTful API handled information POSTed to it correctly. In order to POST to a website/API use the following syntax:
curl --data -X POST "param1=value1¶m2=value2" https://medium.comThe
--data flag does imply a POST request, and therefore you are able to leave off the -X POST flags. The URL you are posting to goes after the data you are sending.DELETE request
If your API follows RESTful conventions, then you would be able to delete a particular instance by sending a DELETE request to the correct route/:id. For example, if I had an API of schedules, and I wanted to delete one of those schedules I would use the following command:
curl -X "DELETE" http://localhost:3000/schedules/:id where :id is the ID of an existing schedule.Altering the Content-Type
Standard data sent with
curl is sent using the application/x-www-form-urlencoded datatype. The primary purpose this type of request is to send a list of name/value pairs to the server. While this is curl’s default setting, you are not limited to sending data this way. It is also not the most efficient way to send data, and you will not want to use the default if you are sending large amounts of data.Browsers must also support sending data as
multipart/form-data. This requires some additional information, primarily MIME (Multipurpose Internet Mail Extension) headers.Additionally, you may choose to send information as JSON. To do so we would use the
-H “Content-Type: application/json” flag to indicate we are adding a header. An example of a POST request sent as JSON would look like the following:curl -H "Content-Type: application/json" --data '{"name": "Sample Schedule Name"}' http://localhost:3000/schedulesThe above
curl POST would create a new schedule for our imaginary RESTful API, where the name of the new schedule would be: “Sample Schedule Name”.A few fun and interesting things you can do with curl
- Get the weather.
By running the command:curl http://wttr.in/LOCATIONand adding the desired location you will get the desired locations forecast.


http://wttr.in/NEWYORK,NY- Test the status of a website. By running the command:
curl -Is https://ny55.blogspot.comyou will be able to see the HTTP response code from the requested URL.-L | grep HTTP/
Find your external IP address. You can locate your external IP address by running the command:
curl ifconfig.me
Your external IP address is different than that of your local IP address.
An external or public IP address is used across the entire Internet to locate computer systems and devices. A local or internal IP address is used inside a private network to locate the computers and devices connected to it.
What’s The Difference Between External And Local IP Addresses?
Conclusion
Curl is a powerful and widely used command. It’s useful when you’re dependent on the command line. It has several options and supports multiple protocols. That’s a pretty great reason to learn this command!
Remember, if you want to learn some advanced commands, simply refer to the manual that should be in all Unix versions:
man curl
We hope this tutorial gave you a good jumping off point for using Curl! How will you use this command? Let us know in the comments!