Disclosure: some links above are affiliate links — if you buy through them I may earn a small commission at no extra cost to you. Thanks for supporting the channel!

Docker concepts
Docker conceptsDocker is a platform for developers and sysadmins toContainerization is increasingly popular because containers are:
- Flexible: Even the most complex applications can be containerized.
- Lightweight: Containers leverage and share the host kernel, making them much more efficient in terms of system resources than virtual machines.
- Portable: You can build locally, deploy to the cloud, and run anywhere.
- Loosely coupled: Containers are highly self sufficient and encapsulated, allowing you to replace or upgrade one without disrupting others.
- Scalable: You can increase and automatically distribute container replicas across a datacenter.
- Secure: Containers apply aggressive constraints and isolations to processes without any configuration required on the part of the user.
Images and containers
Fundamentally, a container is nothing but a running process, with some added encapsulation features applied to it in order to keep it isolated from the host and from other containers. One of the most important aspects of container isolation is that each container interacts with its own private filesystem; this filesystem is provided by a Docker image. An image includes everything needed to run an application - the code or binary, runtimes, dependencies, and any other filesystem objects required.Containers and virtual machines
A container runs natively on Linux and shares the kernel of the host machine with other containers. It runs a discrete process, taking no more memory than any other executable, making it lightweight.By contrast, a virtual machine (VM) runs a full-blown “guest” operating system with virtual access to host resources through a hypervisor. In general, VMs incur a lot of overhead beyond what is being consumed by your application logic.


Set up your Docker environment
Download and install Docker Desktop
Docker Desktop is an easy-to-install application for your Mac or Windows environment that enables you to start coding and containerizing in minutes. Docker Desktop includes everything you need to build, run, and share containerized applications right from your machine.Follow the instructions appropriate for your operating system to download and install Docker Desktop:
Test Docker version
After you’ve successfully installed Docker Desktop, open a terminal and rundocker --version to check the version of Docker installed on your machine. $ docker --version
Docker version 19.03.5, build 633a0ea
Test Docker installation
- Test that your installation works by running the hello-world
Docker image:
$ docker run hello-world Unable to find image 'hello-world:latest' locally latest: Pulling from library/hello-world ca4f61b1923c: Pull complete Digest: sha256:ca0eeb6fb05351dfc8759c20733c91def84cb8007aa89a5bf606bc8b315b9fc7 Status: Downloaded newer image for hello-world:latest Hello from Docker! This message shows that your installation appears to be working correctly. ... - Run
docker image lsto list thehello-worldimage that you downloaded to your machine. - List the
hello-worldcontainer (spawned by the image) which exits after displaying its message. If it is still running, you do not need the--alloption:
    $ docker ps --all

    CONTAINER ID     IMAGE           COMMAND      CREATED            STATUS
    54f4984ed6a8     hello-world     "/hello"     20 seconds ago     Exited (0) 19 seconds ago
Building Docker Image Tips
We need to build an image first before hosing our services with Docker. Here we need a configuration file named Dockerfile that contains descriptions of the building steps. To be brief, we need to copy the project into the image and set the startup method:# Select base image FROM node:10 # Set work directory WORKDIR /nebula-web-console # Copy the current project to the /nebula-web-console directory of the image ADD . /nebula-web-console # Download front-end dependency in the image RUN npm install # Run the building RUN npm run build EXPOSE 7001 # Deployment commands executed when the image starts CMD ["npm", "run", "docker-start"]
Reducing Docker Image
The above configuration file will build a Docker image with a size of about 1.3GB, which looks a bit scary because downloading is too time-consuming even with a fast network. That is totally unacceptable.Using Smaller Base Image
Docker base imageis the basic image on which you add layers and create a final image containing your applications. There are multiple versions of the Node.js image on DockerHub, and each of them share a different internal environment. For example, the alpine version is a more simplified Linux system image that removes some tools like bash, curl etc. to decrease size.Based on our needs, we change the base image to alpine and rebuild to reduce the docker image from 1.3GB to 500MB+. So if the docker image you are building is too large, you can replace the basic image.
Multi-stage Build
Multi-stage build in docker is a new feature introduced in docker 17.05. It is a method to reduce the image size, create a better organization of docker commands, and improve the performance while keeping the dockerfile easy to read and understand.Docker Building PrincipleIn short, multi-stage build is dividing the dockerfile into multiple stages to pass the required artifact from one stage to another and eventually deliver the final artifact in the last stage. This way, our final image won’t have any unnecessary content except our required artifact. Let’s consider an example:
# Set up the image generated in the first step and name it builder
FROM node:10-alpine as builder
WORKDIR /nebula-web-console
# Copy the current project to the image
ADD . /nebula-web-console
# Start building
RUN npm install
RUN npm run build
....
# Start the second step build
FROM node:10-alpine
WORKDIR /nebula-web-console
# Copy the product of the first step image to the current image. Only one image layer is used here, which saves the number of image layers in the previous building step.
COPY --from=builder . /nebula-web-console
CMD ["npm", "run", "docker-start"]
dockerignore
Merging Multiple Layers Into One
When building a Docker image with a Dockerfile, each operation adds a new layer based on the previous step image. We can use & to merge multiple operations to reduce layers. For example:
# The two operations represent two layers
RUN npm install
RUN npm run build
Merge the above command to one:
# It becomes a single layer with &
RUN npm install && npm run build
Regular Front-End Optimization
- Compress ugly code and remove source code Finish this step when building image so that the image size is further reduced.
- Only downloading code needed for production with node_modules Finish this step when deploying, be sure to download only third party dependence code for production: npm install --production
- Place public source on CDN If the image is expected to run in network environment, place large public files ( pictures and third party libraries, etc.) on the the CDN server so that some resources are separated and the image size is further reduced.
Tip #1 — Use a smaller base image
FROM ubuntuwill set you to 128MB on the outset. Consider using a smaller base image. For each
apt-get installor yum install line you add in your Dockerfileyou will be increasing the size of the image by that library size. Realize that you probably don’t need many of those libraries you are installing.
Consider using an alpine base image (only 5MB in size). Most likely, there are alpine tags for the programming language you are using. For example, Python has
2.7-alpine(~50MB) and3.5-alpine(~65MB).
Tip #2 — Don’t install debug tools like vim/curl
I notice many developers installvim and curl in their Dockerfile so that they can more easily debug their application. Unless your application depends on it, don’t install those dependencies. Doing so defeats the purpose of using a small base image.
But how do I debug?
One technique is to have a development Dockerfile and a production Dockerfile. During development, have all of the tools you need, and then when deploying to production remove the development tools.
Tip #3 — Minimize Layers
Each line of aDockerfile is a step in the build process; a layer that takes up size. Combine your RUN statements to reduce the image size. Instead of
FROM debian
RUN apt-get install -y <packageA>
RUN apt-get install -y <packageB>
Do
FROM debian
RUN apt-get install -y <packageA> <packageB>
A drawback of this approach is that you’ll have to rebuild the entire image each time you add a new library. If you aren’t aware, Docker doesn’t rebuild layers it’s already built, and it caches the
Dockerfile line by line Try changing one character of a Dockerfile you’ve already built, and then rebuild. You’ll notice that each step above that line will be recognized as already been built, but the line you changed (and each line following) will be rebuilt.
A strategy I recommend is that while in development and testing dependencies, separate out the
RUN commands. Once you’re ready to deploy to production, combine the RUN statements into one line.
Tip #4 Use — no-install-recommends on apt-get install
Adding — no-install-recommendsto apt-get install -y can help dramatically reduce the size by avoiding installing packages that aren’t technically dependencies but are recommended to be installed alongside packages.
apk add commands should have--no-cache added.
Tip #5 Add rm -rf /var/lib/apt/lists/* to same layer as apt-get installs
Addrm -rf /var/lib/apt/lists/* at the end of the apt-get -y install to clean up after install packages.
For
yum, add yum clean all
Also, if you are install
wget or curl in order to download some package, remember to combine them all in one RUN statement. Then at the end of the run statement, apt-get remove curl or wget once you no longer need them. This advice goes for any package that you only need temporarily.
Tip #6 Use FromLatest.io
FromLatest will Lint your Dockerfile and check for even more steps you can perform to reduce your image size.There are many other tips out there. Feel free to share any that I may of missed.
What to do for smaller Docker images
What we’re trying to solve
I bet that everyone who built their first Docker image that compiled some code was surprised (not in a good way) by the size of that image.
Look at this trivial “hello world” program in C:
/* hello.c */
int main () {
puts("Hello, world!");
return 0;
}
We could build it with the following Dockerfile
FROM gcc
COPY hello.c .
RUN gcc -o hello hello.c
CMD ["./hello"]
… But the resulting image will be more than 1 GB, because it will have the whole gcc image in it!
If we use e.g. the Ubuntu image, install a C compiler, and build the program, we get a 300 MB image; which looks better, but is still way too much for a binary that, by itself, is less than 20 kB:
$ ls -l hello
-rwxr-xr-x 1 root root 16384 Nov 18 14:36 hello
Same story with the equivalent Go program:
package main
import "fmt"
func main () {
fmt.Println("Hello, world!")
}
Building this code with the golang image, the resulting image is 800 MB, even though the hello program is only 2 MB:
$ ls -l hello
-rwxr-xr-x 1 root root 2008801 Jan 15 16:41 hello
There has to be a better way!
Let’s see how to drastically reduce the size of these images. In some cases, we will achieve 99.8% size reduction (but we will see that it’s not always a good idea to go that far).
Pro Tip: To easily compare the size of our images, we are going to use the same image name, but different tags. For instance, our images will be hello:gcc, hello:ubuntu, hello:thisweirdtrick, etc. That way, we can run
and it will list all the tags for that hello image, with their sizes, without being encumbered with the bazillions of other images that we have on our Docker engine.docker images hello
Multi-stage builds
This is the first step (and the most drastic) to reduce the size of our images. We need to be careful, though, because if it’s done incorrectly, it can result in images that are harder to operate (or could even be completely broken).
Multi-stage builds come from a simple idea: “I don’t need to include the C or Go compiler and the whole build toolchain in my final application image. I just want to ship the binary!”
We obtain a multi-stage build by adding another FROM line in our Dockerfile. Look at the example below:
FROM gcc AS mybuildstage
COPY hello.c .
RUN gcc -o hello hello.c
FROM ubuntu
COPY --from=mybuildstage hello .
CMD ["./hello"]
We use the gcc image to build our hello.c program. Then, we start a new stage (that we call the “run stage”) using the ubuntu image. We copy the hello binary from the previous stage. The final image is 64 MB instead of 1.1 GB, so that’s about 95% size reduction:
$ docker images minimage
REPOSITORY TAG ... SIZE
minimage hello-c.gcc ... 1.14GB
minimage hello-c.gcc.ubuntu ... 64.2MB
Not bad, right? We can do even better. But first, a few tips and warnings.
You don’t have to use the AS keyword when declaring your build stage. When copying files from a previous stage, you can simply indicate the number of that build stage (starting at zero).
In other words, the two lines below are identical:
COPY --from=mybuildstage hello .
COPY --from=0 hello .
Personally, I think it’s fine to use numbers for build stages in short Dockerfiles (say, 10 lines or less), but as soon as your Dockerfile gets longer (and possibly more complex, with multiple build stages), it’s a good idea to name the stages explicitly. It will help maintenance for your team mates (and also for future you who will review that Dockerfile months later).
Warning: use classic images
I strongly recommend that you stick to classic images for your “run” stage. By “classic”, I mean something like CentOS, Debian, Fedora, Ubuntu; something familiar. You might have heard about Alpine and be tempted to use it. Do not! At least, not yet. We will talk about Alpine later, and we will explain why we need to be careful with it.
Warning: COPY --from uses absolute paths
When copying files from a previous stage, paths are interpreted as relative to the root of the previous stage.
The problem appears as soon as we use a builder image with a WORKDIR, for instance the golang image.
If we try to build this Dockerfile:
FROM golang
COPY hello.go .
RUN go build hello.go
FROM ubuntu
COPY --from=0 hello .
CMD ["./hello"]
We get an error similar to the following one:
COPY failed: stat /var/lib/docker/overlay2/1be...868/merged/hello: no such file or directory
This is because the COPY command tries to copy /hello, but since the WORKDIR in golang is /go, the program path is really /go/hello.
If we are using official (or very stable) images in our build, it’s probably fine to specify the full absolute path and forget about it.
However, if our build or run images might change in the future, I suggest to specify a WORKDIR in the build image. This will make sure that the files are where we expect them, even if the base image that we use for our build stage changes later.
Following this principle, the Dockerfile to build our Go program will look like this:
FROM golang
WORKDIR /src
COPY hello.go .
RUN go build hello.go
FROM ubuntu
COPY --from=0 /src/hello .
CMD ["./hello"]
If you’re wondering about the efficiency of multi-stage builds for Golang, well, they let us go (no pun intended) from a 800 MB image down to a 66 MB one:
$ docker images minimage
REPOSITORY TAG ... SIZE
minimage hello-go.golang ... 805MB
minimage hello-go.golang.ubuntu-workdir ... 66.2MB
Using FROM scratch
Back to our “Hello World” program. The C version is 16 kB, the Go version is 2 MB. Can we get an image of that size?
Can we build an image with just our binary and nothing else?
Yes! All we have to do is use a multi-stage build, and pick scratch as our run image. scratch is a virtual image. You can’t pull it or run it, because it’s completely empty. This is why if a Dockerfile starts with FROM scratch, it means that we’re building from scratch, without using any pre-existing ingredient.
This gives us the following Dockerfile:
FROM golang
COPY hello.go .
RUN go build hello.go
FROM scratch
COPY --from=0 /go/hello .
CMD ["./hello"]
If we build that image, its size is exactly the size of the binary (2 MB), and it works!
There are, however, a few things to keep in mind when using scratch as a base.
No shell
The scratch image doesn’t have a shell. This means that we cannot use the string syntax with CMD (or RUN, for that matter). Consider the following Dockerfile:
...
FROM scratch
COPY --from=0 /go/hello .
CMD ./hello
If we try to
the resulting image, we get the following error message:docker run
docker: Error response from daemon: OCI runtime create failed: container_linux.go:345: starting container process caused "exec: \"/bin/sh\": stat /bin/sh: no such file or directory": unknown.
It’s not presented in a very clear way, but the core information is here: /bin/sh is missing from the image.
This happens because when we use the string syntax with CMD or RUN, the argument gets passed to /bin/sh. This means that our CMD ./hello above will execute /bin/sh -c "./hello", and since we don’t have /bin/sh in the scratch image, this fails.
The workaround is simple: use the JSON syntax in the Dockerfile. CMD ./hello becomes CMD ["./hello"]. When Docker detects the JSON syntax, it runs the arguments directly, without a shell.
No debugging tools
The scratch image is, by definition, empty; so it doesn’t have anything to help us troubleshoot the container. No shell (as we said in the previous paragraph) but also no ls, ps, ping, and so on and so forth. This means that we won’t be able to enter the container (with
or docker exec
) to look into it.kubectl exec
(Note that strictly speaking, there are some methods to troubleshoot our container anyway. We can use
to get files out of the container; we can use docker cp
to interact with the network stack; and a low-level tool like nsenter can be very powerful. Recent versions of Kubernetes have the concept of ephemeral container, but it’s still in alpha. And let’s keep in mind that all these techniques will definitely make our lives more complicated, especially when we have so much to deal with already!)docker run --net container:
One workaround here is to use an image like busybox or alpine instead of scratch. Granted, they’re bigger (respectively 1.2 MB and 5.5 MB), but in the grand scheme of things, it’s a small price to pay if we compare it to the hundreds of megabytes, or the gigabytes, of our original image.
No libc
That one is trickier to troubleshoot. Our simple “hello world” in Go worked fine, but if we try to put a C program in the scratch image, or a more complex Go program (for instance, anything using network pacakges), we will get the following error message:
standard_init_linux.go:211: exec user process caused "no such file or directory"
Some file seems to be missing. But it doesn’t tell us which file is missing exactly.
The missing file is a dynamic library that is necessary for our program to run.
What’s a dynamic library and why do we need it?
After a program is compiled, it gets linked with the libraries that it is using. (As simple as it is, our “hello world” program is still using libraries; that’s where the puts function comes from.) A long time ago (before the 90s), we used mostly static linking, meaning that all the libraries used by a program would be included in the binary. This is perfect when software is executed from a floppy disk or a cartridge, or when there is simply no standard library. However, on a timesharing system like Linux, we run many concurrent programs that are stored on a hard disk; and these programs almost always use the standard C library.
In that scenario, it gets more advantageous to use dynamic linking. With dynamic linking, the final binary doesn’t contain the code of all the libraries that it uses. Instead, it contains references to these libraries, like “this program needs functions cos and sin and tan from libtrigonometry.so. When the program is executed, the system looks for that libtrigonometry.so and loads it alongside the program so that the program can call these functions.
Dynamic linking has multiple advantages.
1. It saves disk space, since common libraries don’t have to be duplicated anymore.
2. It saves memory, since these libraries can be loaded once from disk, and then shared between multiple programs using them.
3. It makes maintenance easier, because when a library is updated, we don’t need to recompile all the programs using that library.
(If we want to be thorough, memory savings aren’t a result of dynamic libraries but rather of shared libraries. That being said, the two generally go together. Did you know than on Linux, dynamic library files typically have the extension .so, which stands for shared object? On Windows, it’s .DLL, which stands for Dynamic-link library.)
Back to our story: by default, C programs are dynamically linked. This is also the case for Go programs that are using some packages. Our specific program uses the standard C library, which on recent Linux systems will be in file libc.so.6. So to run, our program needs that file to be present in the container image. And if we’re using scratch, that file is obviously absent. This is the same if we use busybox or alpine, because busybox doesn’t contain a standard library, and alpine is using another one, that is incompatible. We’ll tell more about that later.
How do we solve this? There are at least 3 options.
Building a static binary
We can tell our toolchain to make a static binary. There are various ways to achieve that (depending on how we build our program in the first place), but if we’re using gcc, all we have to do is add -static to the command line:
gcc -o hello hello.c -static
The resulting binary is now 760 kB (on my system) instead of 16 kB. Of course, we’re embedding the library in the binary, so it’s much bigger. But that binary will now run correctly in the scratch image.
We can get an even smaller image if we build a static binary with Alpine. The result is less than 100 kB!
Adding the libraries to our image
We can find out which libraries our program needs with the ldd tool:
$ ldd hello
linux-vdso.so.1 (0x00007ffdf8acb000)
libc.so.6 => /usr/lib/libc.so.6 (0x00007ff897ef6000)
/lib64/ld-linux-x86-64.so.2 => /usr/lib64/ld-linux-x86-64.so.2 (0x00007ff8980f7000)
We can see the libraries needed by the program, and the exact path where each of them was found by the system.
In the example above, the only “real” library is libc.so.6. linux-vdso.so.1 is related to a mechanism called VDSO (virtual dynamic shared object), which accelerates some system calls. Let’s pretend it’s not there. As for ld-linux-x86-64.so.2, it’s actually the dynamic linker itself. (Technically, our hello binary contains information saying, “hey, this is a dynamic program, and the thing that knows how to put all its parts together is ld-linux-x86-64.so.2”.)
If we were so inclined, we could manually add all the files listed above by ldd to our image. It would be fairly tedious, and difficult to maintain, especially for programs will lots of dependencies. For our little hello world program this would work fine. But for a more complex program, for instance something using DNS, we would run into another issue. The GNU C library (used on most Linux systems) implements DNS (and a few other things) through a fairly complex mechanism called the Name Service Switch (NSS in short). This mechanism needs a configuration file, /etc/nsswitch.conf, and additional libraries. But these libraries don’t show up with ldd, because they are loaded later, when the program is running. If we want DNS resolution to work correctly, we still need to include them! (These libraries are typically found at /lib64/libnss_*.)
I personally can’t recommend going that route, because it is quite arcane, difficult to maintain, and it might easily break in the future.
Using busybox:glibc
There is an image designed specifically to solve all these issues: busybox:glibc. It is a small image (5 MB) using busybox (so providing a lot of useful tools for troubleshooting and operations) and providing the GNU C library (or glibc). That image contains precisely all these pesky files that we were mentioning earlier. This is what we should use if we want to run a dynamic binary in a small image.
Keep in mind, however, that if our program uses additional libraries, these libraries will need to be copied as well.
Recap and (partial) conclusion
Let’s see how we did for our “hello world” program in C. Spoiler alert: this list includes results obtained by leveraging Alpine in ways that will be described in the next part of this series.
· Original image built with gcc: 1.14 GB
· Multi-stage build with gcc and ubuntu: 64.2 MB
· Static glibc binary in alpine: 6.5 MB
· Dynamic binary in alpine: 5.6 MB
· Static binary in scratch: 940 kB
· Static musl binary in scratch: 94 kB
That’s a 12000x size reduction, or 99.99% less disk space.
Not bad.
Personally, I wouldn’t go with the scratch images (because troubleshooting them might be, well, trouble) but if that’s what you’re after, they’re here for you!
Problem Scenerio
I got a low disk space problem on that server, I realised that there are too many images present on that server (as I rebuild images when doing any updates/fixes) when I tried to remove unused images, I got an error message as they are the parent of new image. i.e I cant remove those unused image anymore as they are linked to new images now :(
Also, as Im using overlay2 storage driver , I found that a few GB tied up at
/var/lib/docker/overlay2:
<strong>root@ip-172-30-0-216:/# du -sh /var/lib/docker/overlay2/</strong>
< strong>49G /var/lib/docker/overlay2</strong>
Follow the steps:
< strong>docker run -tid --name=<UNIQUE-CONTAINER-NAME> <IMAGE-NAME> bash</strong>
# export the container to a tarball
< strong><span class="crayon-e">docker </span><span class="crayon-v">export</span> <span class="crayon-o"><UNIQUE-CONTAINER-NAME</span><span class="crayon-o">> -o image-name.tar</span></strong>
rm -rf /var/lib/docker. Alternatively, you can stop the docker service, move the directory (as a backup), and start the service again.< strong>service docker stop</strong>
# Remove docker folder
< strong>rm -rf /var/lib/docker</strong>
# Start docker service
< strong>service docker start</strong>
# import back the saved image tarball
< strong><span class="crayon-o">cat image-name.tar | docker import - image-name:latest</span></strong>
Thats it.
In this way, I saved few GBs of my server disk space
"Building docker images is pretty pretty easy but building small docker images is not always easy."
Why is the image size so important?
Reducing Docker final image size will eventually lead to:- Reduced build time
- Reduced disk usage
- Reduced download time
- Better security due to smaller footprint
- Faster deployments
What is a layer?
To reduce an image size, it’s important to understand what a layer is.Every Docker image is composed of multiple intermediate images (layers) which form the final image. This layers stack allows Docker to reuse images when a similar instruction is found.
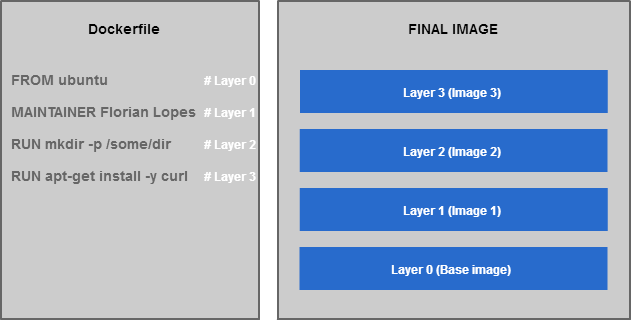
Each Dockerfile instruction creates a layer at build time:
FROM ubuntu                  # This base image is already composed of X layers (4 at the time of writing)
MAINTAINER Florian Lopes     # One layer
RUN mkdir -p /some/dir       # One layer
RUN apt-get install -y curl  # One layer
Let’s build this image:
$ docker build -t curl .
[...]

$ docker images curl
REPOSITORY            TAG            IMAGE ID            CREATED            VIRTUAL SIZE
test                  latest         732afd2af5a9        About an hour ago  199.3 MB
To see the intermediate layers of an image, type the following command:
$ docker history curl
IMAGE               CREATED             CREATED BY                                      SIZE
732afd2af5a9        About an hour ago   /bin/sh -c apt-get install -y curl              11.32 MB
912b76f3dd8e        About an hour ago   /bin/sh -c mkdir -p /some/dir                   0 B
525804109d88        About an hour ago   /bin/sh -c #(nop) MAINTAINER Florian Lopes      0 B
c88b54fedc4f        9 days ago          /bin/sh -c #(nop) CMD ["/bin/bash"]             0 B
44802199e669        9 days ago          /bin/sh -c sed -i 's/^#\s*\(deb.*universe\)$/   1.895 kB
74a2c71e6050        9 days ago          /bin/sh -c set -xe                                                  && echo '#!/bin/sh' > /u   194.5 kB
140d9fb3c81c        9 days ago          /bin/sh -c #(nop) ADD file:ed7184ebed5263e677   187.8 MB
You can see below that each layer have a size and a command associated to create it. The final image built from this Dockerfile contains 3 layers plus all Ubuntu image layers.
Although this can be somehow difficult to understand, this structure is very important as it allows Docker to cache layers to make the builds much faster. When building an image, the Docker daemon will check if the intermediate image (layer created by the instruction) already exists in its cache to reuse it. If the intermediate layer is not found or has changed, the Docker daemon will pull or rebuild it.
How to reduce image size
As we just saw, the layers play an important role in the final image size. To reduce the final size, we have to focus on the intermediate layers.Although some of them cannot be reduced (especially the one you start from), we can use a few tips to help reduce the final image size.
Group commands in ONE instruction when possible
Do not perform multiple installs in multiple RUN instructions. Let's compare multiple and single instructions by installing/removing packages :Installing packages
Separate instructions
To illustrate this statement, let’s build an image with two separate RUN instructions which installcurl and mysql-client packages:
FROM ubuntu:16.04

MAINTAINER Florian Lopes

RUN apt-get update
RUN apt-get install -y curl
RUN apt-get install -y mysql-client
$ docker build  -t tip1 .
[...]
$ docker images tip1
 REPOSITORY          TAG                 IMAGE ID            CREATED             VIRTUAL SIZE
 tip1                latest              7e9105c27586        3 minutes ago       248.4 MB
Single instruction
Now, let’s gather the two instructions in only one:FROM ubuntu:16.04
MAINTAINER Florian Lopes
RUN apt-get update && apt-get install -y curl mysql-client
Let’s build our image again:
$ docker build  -t tip1 .
[...]
$ docker images tip1
REPOSITORY          TAG                 IMAGE ID            CREATED             VIRTUAL SIZE
tip1                latest              2886d17dc7f4        9 seconds ago       248 MB
Although the size difference is not so significant, you can expect better results when installing multiple packages.
Removing packages
Separate instructions
Let’s see another interesting example in which we remove a temporary package in a separate instruction:FROM ubuntu:16.04
MAINTAINER Florian Lopes
RUN apt-get update && apt-get install -y curl && curl http://[...]
RUN apt-get remove -y curl
You can see here that the
curl package is immediately removed after being installed, in a separate instruction.
Let’s see the final image size:
$ docker build -t tip2 .
[...]
$ docker images tip2
REPOSITORY          TAG                 IMAGE ID            CREATED             VIRTUAL SIZE
tip1                latest              632f4bf8667c        8 seconds ago       182.7 MB
Single instruction
This time, let’s combine these instructions into one line:FROM ubuntu:16.04
MAINTAINER Florian Lopes
RUN apt-get update && apt-get install -y curl && curl http://[...] && apt-get remove -y curl
$ docker build -t tip3 .
[...]
$ docker images tip3
REPOSITORY          TAG                 IMAGE ID            CREATED             VIRTUAL SIZE
tip1                latest              bfea5f186684        11 seconds ago      182.1 MB
Why is there a difference?
As we saw earlier, the Docker daemon creates an image for each instruction to execute the associated command. In the separates instructions example, the superposition of all these images creates the final one. Because of this strategy, themysql-client package is still part of the final image (in the third layer actually) although being removed further.


Do not install packages recommendations (-–no-install-recommends) when installing packages
RUN apt-get update apt-get install -y --no-install-recommends curl
Remove no longer needed packages or files, in the SAME instruction if possible
Packages example:
RUN apt-get update && \
apt-get install -y --no-install-recommends curl && \
curl <a href="http://download.app.com/install.sh">http://download.app.com/install.sh</a> && \
.install.sh && apt-get remove -y curl
In this example, the package
curl is only needed to retrieve an install file. Since it is not needed anymore, it can be removed (in the SAME instruction).
Files example:
RUN wget ${APP_URL} -o /tmp/app/install.sh && \
./tmp/app/install.sh && \ rm -rf /tmp/app/ && \
rm -rf /var/lib/apt/lists/*
Start with a smaller base image
Do you need every Ubuntu (or other base images) packages? If not, you should consider starting with a smaller base image like Alpine (https://hub.docker.com/_/alpine/) which will likely become the base image for all official Docker images (Jenkins, Maven). This base image weights around 5MB whereas Ubuntu one is about 188MB. You can see a great comparison of Docker base images here: https://www.brianchristner.io/docker-image-base-os-size-comparison/.
Inspecting images from DockerHub
To easily inspect a DockerHub image, you can use the MicroBadger service:https://microbadger.com/