Quick Navigation :
Possible Causes for the “We Couldn’t Complete the Updates Undoing Changes” Issue
[3].png)
- Solution 1. Restore Your System to an Earlier Date
- Solution 2. Run a Startup Repair
- Solution 3. Run an SFC and DISM Scan
- Solution 4. Delete the Software Distribution Folder
- Solution 5. Extend Your Windows System Partition Size
- Solution 6. Turn on the App Readiness Service
- Solution 7. Disable Automatic Windows Updates
- Solution 8. Reset Your PC
Startup Repair Log:After Startup Repair has run, a text log with diagnostic information and repair result is generated within the recovery console. This log file is located at %WINDIR%\System32\LogFiles\Srt\SrtTrail.txt
🛒 Recommended gear on Amazon
Disclosure: some links above are affiliate links — if you buy through them I may earn a small commission at no extra cost to you. Thanks for supporting the channel!
- We can execute startrep.exe tool in recovery console to address corrupt registry issues if any in Windows Server 2008 R2
If the Windows registry is slightly or moderately corrupted, you may be able to restart the computer in Safe mode and use System Restore to restore the registry of the computer to the last known good configuration. However, if the Windows registry is severely corrupted, all types of logon will be prevented. Attempting to log on to Windows causes the system to fail and then to restart. In this situation, you will need to boot the system into the Recovery Console instead of into Windows. Once in the Recovery Console, you can use the Startup Repair tool. Startup Repair automates common diagnostic and repair tasks of unbootable Windows installations.
a) Boot from your Windows Vista or Windows Server 2008 DVDb) On the first screen of Setup choose Nextc) In the lower left of the screen choose "repair your computer"d) On the System Recovery Options screen choose your installation of Windows and then click nexte) Click "Command prompt"f) Go to X:\sources\recovery> startrep.exeg) This will take a while but will address any registry related issues.
- Chkdsk to address disk and filesystem based issues.
Boot the machine in recovery console mode and run chkdsk on C: drive [Local Fixed Disk]chkdsk C: /f and then chkdsk c: /r
/f - Fixes errors on the disk. The disk must be locked. If chkdsk cannot lock the drive, a message appears that asks you if you want to check the drive the next time you restart the computer.
/r - Locates bad sectors and recovers readable information. The disk must be locked. /r includes the functionality of /f, with the additional analysis of physical disk errors.

System File Check (SFC.exe) is a Windows utility that helps you scan for corruptions in Windows system files. It will try restoring any corrupted files found.
If the System Restore taking forever Windows 10 issue happens, it is likely that certain files are damaged.
Here, run System File Check to scan Windows and check if it helps.
- Enter WinRE by using an installation disc, just like the first method.
- Navigate to Choose an option > Troubleshoot > Advanced Options > Command Prompt.
- Choose an account and enter the password.
- Type sfc /scannow in the pop-out window and press Enter to troubleshoot missing or corrupted system files on Windows
Possible Causes for the “We Couldn’t Complete the Updates Undoing Changes” Issue
According to the reports we gathered from some forums, we found the error “We Couldn’t Complete the Updates Undoing Changes” often occurs when failing to install Windows updates or at the first restart after the installation completes.We are experiencing an issue with Windows 10 1703 April Cumulative Update (KB4493474). Once the installation of this update completes, after a reboot we get the below error. Error - We couldn’t complete the updates. Undoing changes. Then the update is retrying to install again with the same behavior. Is this an expected behavior or known issue with this update? As we need to roll out this update to over 6000 machines in our environment. If we need to do any fix before applying this update, kindly advice.As a common Windows update error, the error “we couldn’t complete the updates undoing changes Windows 10” occurs due to the following possible causes:
- Lack of enough free disk space. This is the major cause of this error. If there is not enough free space for the update on your system partition, Windows updates will not be installed smoothly.
- The update is interrupted during the installation process. Windows updates may fail to install because of such as sudden power outage, which triggers the error “we couldn’t complete the updates undoing changes”.
- Corrupted system files. It cannot be excluded that your system files may be corrupted or damaged. For this issue, you can run an SFC scan or DISM to check and fix it.

Windows 10 Showing Wrong Hard Disk Free Space-Quick Fix It
Why hard drive showing wrong free space in Windows 10? How to solve this problem effectively? This post shares you with all the answers.
Before You Do
According to the survey, we found a great many users cannot log into their Windows and access the files when they encounter the error. The error “we couldn’t complete the updates undoing changes” keeps appearing each time when restarting the computer.So, you need to launch the Advanced Start Screen and boot your Windows into Safe Mode first so as to perform the following methods smoothly. How to access the Advanced Start Screen? Here are 2 options you can access the Advanced Start Screen and boot into Safe Mode.
The first option is to perform a hard power reset by turning your computer off using the power button and repeating this step three times in a row, then the Advanced Startup (Automatic Repair) screen should automatically appear.
Alternatively, you can follow the steps below to enter into WinRE and boot into Safe Mode.
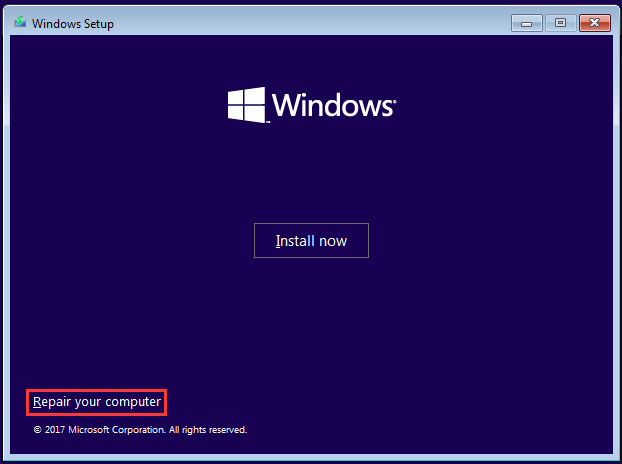
Step 1. Restart your computer with a DVD or USB Windows installation media. Once you arrive at the Install now screen, click Repair your computer and then you will enter WinRE.
After that, you can try the following solutions to fix error “we couldn’t complete the updates undoing changes don’t turn off your computer”.
Note: Here we apply the following solutions via the Windows Installation media to access the Advanced Startup screen. Well, you can also choose the first method.
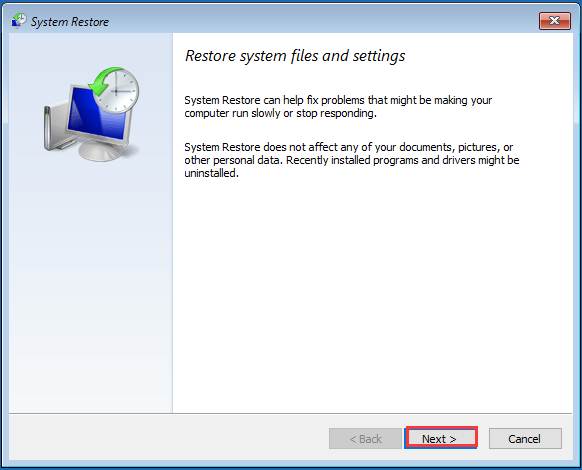
Solution 1. Restore Your System to an Earlier Date
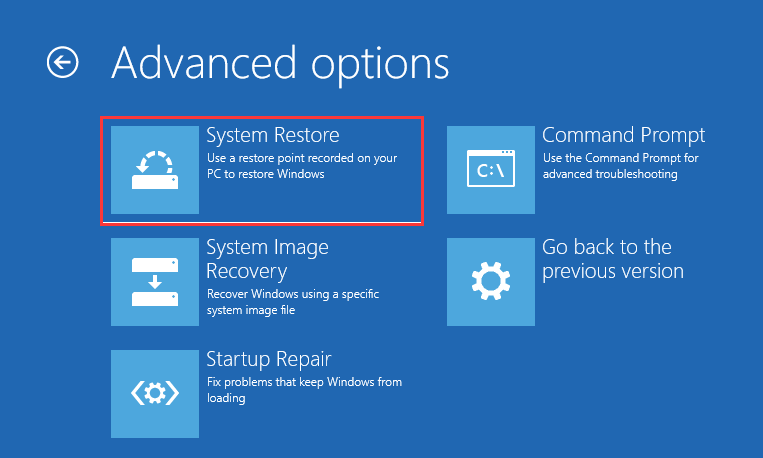
The system restores point is a built-in feature that can help you restore your Windows system to an earlier date without affecting your files and data. If you have a system restore point before this error occurs, you can follow the detailed steps to restore system.Step 1.Boot your computer from the Windows installation media. Once you enter into WinRE, click Troubleshooting > Advanced options in order.
Step 2. >In the Advanced options menu, click System Restore. Then you will see a message asking you to enter the recovery key, just click Skip the drive or you can also enter your account’s password.
Tip: If you have 2 or more Windows systems, please select the Windows system you want to recover.
Step 3. In the pop-up window, click Next.
Step 4. If there is a list of restore points (including the automatic restore point and the restore point you created by yourself), select the Restore point that you want to recover and click Next.
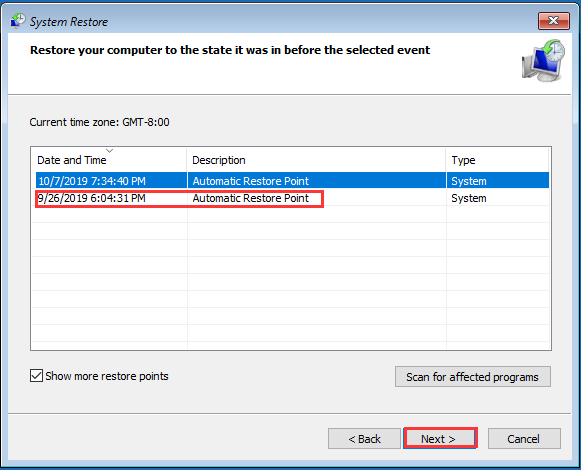
Step 5. Then confirm your restore point by clicking the Finish button. After that, your computer will be restored to an earlier date.
Solution 2. Run a Startup Repair
The Startup Repair is a Windows diagnostic troubleshooting tool that can help you repair Windows operating system when failing to log into the computer. This method often can be used to fix the problem with some corrupted or missing system files.Corrupted system files may cause “Windows 10 we couldn’t complete the updates undoing changes”. To fix this problem, you can follow the steps to run a Startup Repair.
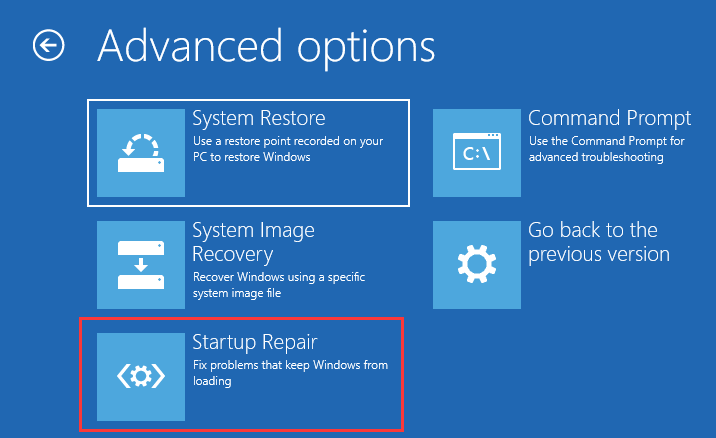
Step 1. Once you enter WinRE, click Troubleshooting > Advanced options in order.
Step 2. Inside the Advanced options window, click Startup Repair. Then it will check and fix your PC automatically. This process will take some time, just wait patiently.
After that, see if this repair can get rid of this problem.
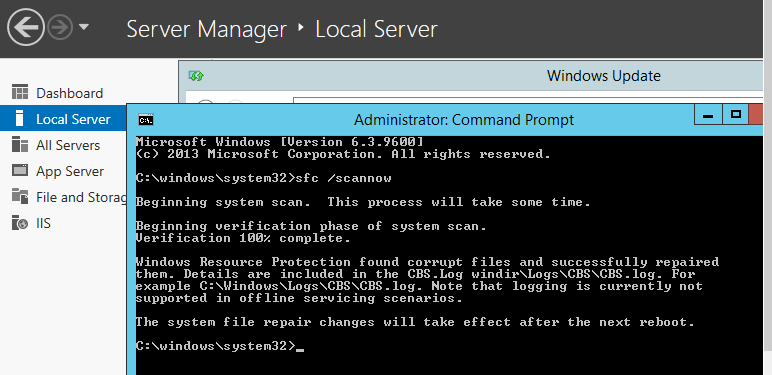
Solution 3. Run an SFC and DISM Scan
System File Checker (SFC) scan also is a diagnostic utility that enables the user to scan and restore corrupted system files. This tool can be helpful when dealing with Windows updates issues. Here’s how to do that:Step 1.Select Command Prompt in the Advanced options window.

Step 2. In the Command Prompt window, type sfc /scannow command and hit Enter. This process will take some time to complete.
Note: The SFC scan will scan all protected system files and replace corrupted files with a cached copy.

After the sfc scan completes, you can check if “we couldn’t complete the updates undoing changes Windows 10” error still persists.
In addition, you can run a DISM scan. DISM is a utility that can be used to repair Windows images including WinRE, Windows Setup, and Windows PE. To run a DISM scan, you need to do:
Step 1. Once the Command prompt opens, type the “DISM /Online /Cleanup-Image /RestoreHealth" command and hit Enter.
Step 2. Restart your computer and check the error is fixed or not.

Solved: the Device \Device\Harddisk0\DR0 has a Bad Block
Some users reported that they notice the error message “the Device \Device\Harddisk0\DR0 has a Bad Block” when opening the Event Viewer.
Solution 4. Delete the Software Distribution Folder
Usually, Windows updates files are stored in Software Distribution Folder until they are downloaded completely. Deleting the Software Distribution folder’s contents might resolve “Windows 10 we couldn’t complete the updates undoing changes” error.In order to delete this folder, you need to boot your Windows into Safe Mode. Here are what you can do:
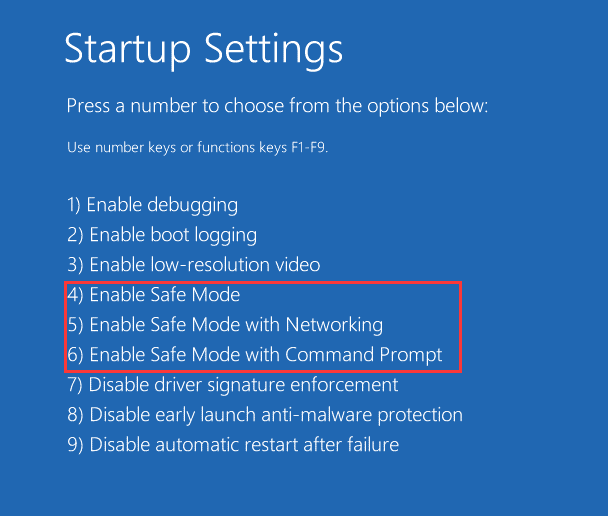
Step 1. After you enter into WinRE, click Troubleshooting > Advanced options > Startup Settings in order.
Step 2. In the pop-up window, click Restart on the bottom right corner. Then you can see a list of functions keys, just press the F4 key on your keyboard to enable Safe Mode. Well, you can also click F5 or F6 if you need it.
After that, your Windows will boot into Safe Mode. To delete the Software Distribution folder, you need to disable some Windows update services. Here is a full guide.
Step 1. Press Win + R keys to call out the Run box and type cmd in it. Then press Ctrl + Shift + Enter to open an elevated command prompt.
Step 2. Type the following commands and hit enter one by one.
- net stop wuauserv
- net stop bits
- net stop cryptSvc
- net stop msiserver
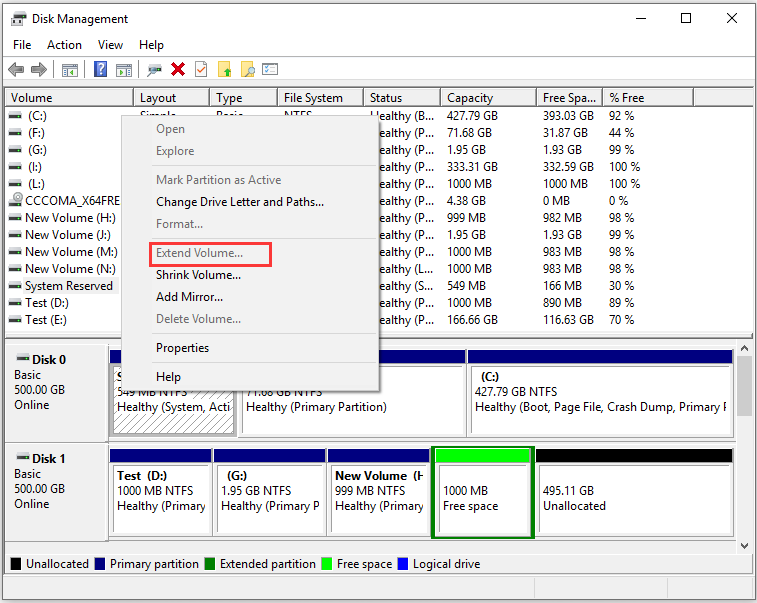
Solution 5. Extend Your Windows System Partition Size
As mentioned above, insufficient disk space is also responsible for “we couldn’t complete the updates undoing changes don’t turn off your computer” error. To fix this problem, extending your windows system partition size may be a good solution.Usually, you may choose Disk Management to extend the system partition. However, a great many users encountered the problem “Extend volume grayed out”. It is a great inconvenience.
Solution 6. Turn on the App Readiness Service
App Readiness service is required to run a Windows update. This method has been proved by some affected users. Here is a quick guide.Note: The following 2 methods are also performed under the Safe Mode.
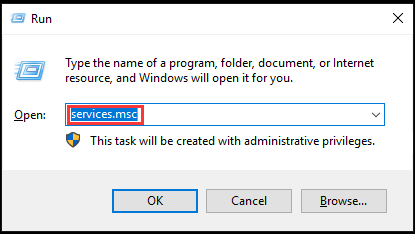
Step 1. Press Win + R keys to open the Run box, and type services.msc in it and hit Enter.
Step 2. Go to the App Readiness service and double click it to open the Properties.
Step 3. Then set the Startup type to Automatic and click Start to enable this service.
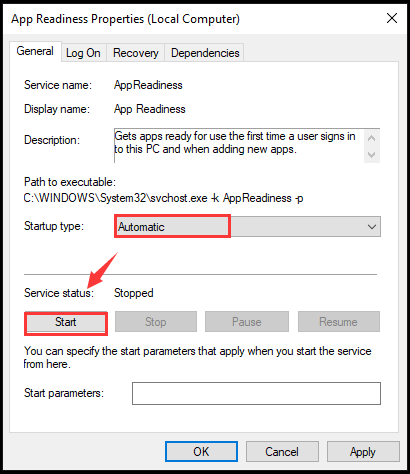
Step 4. Click App and OK to execute this change. Then restart your computer to check if this problem is fixed.
Solution 7. Disable Automatic Windows Updates
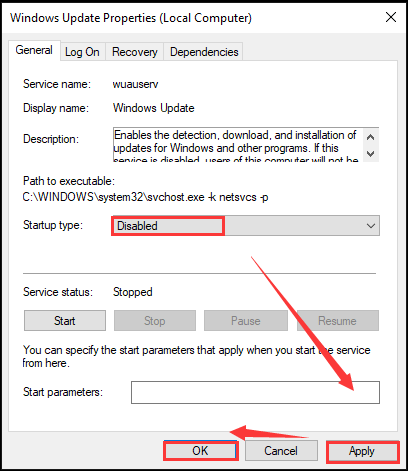
In addition to the above solution, you can prevent Windows from updating automatically to fix this problem. Here is how to disable the automatic Windows updates.Step 1. Open the Services window as shown in Solution 6. Then go to Windows Update service and double click it to open the Properties
Step 2. Set the Startup type to Disabled and click Stop if this service is running.
Step 3. Click App and OK to execute this change. Then restart your computer to see if the error is resolved.
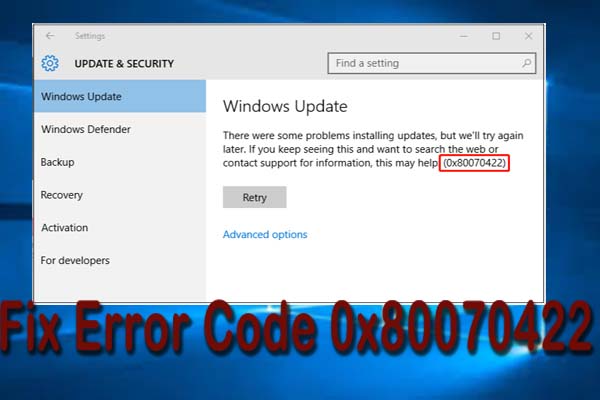
Just like other Windows 10 update error, the error code 0x80070422 is relatively easy to fix. You will learn the top 7 methods to fix this error in this article.
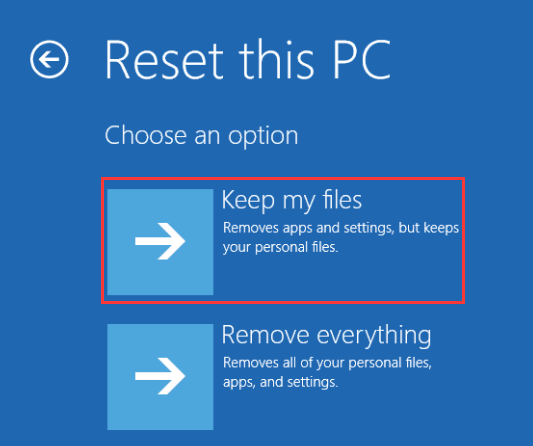
Solution 8. Reset Your PC
Right now, if all the above methods fail to work with you, you can try the last method. Reset this PC can help you troubleshoot some serious operating system problem. To do so, you need to access the Advanced Startup screen as well. For that:Step 1. Select Troubleshoot > Reset this PC option in order.
Step 2. Then you will see 2 options. Here we recommend you choose the Keep my file. This option will remove apps and settings, but keep your personal files. If you choose Remove everything, all of your personal files and apps will be removed.