Disclosure: some links above are affiliate links — if you buy through them I may earn a small commission at no extra cost to you. Thanks for supporting the channel!
what is the scheduler for?
The Kubernetes scheduler is in charge of scheduling pods onto nodes. Basically it works like this:
- You create a pod
- The scheduler notices that the new pod you created doesn’t have a node assigned to it
- The scheduler assigns a node to the pod

It’s not responsible for actually running the pod – that’s the kubelet’s job. So it basically just needs to make sure every pod has a node assigned to it. Easy, right?
Kubernetes in general has this idea of a “controller”. A controller’s job is to:
- look at the state of the system
- notice ways in which the actual state does not match the desired state (like “this pod needs to be assigned a node”)
- repeat
The scheduler is a kind of controller. There are lots of different controllers and they all have different jobs and operate independently.
So basically you could imagine the scheduler running a loop like this:
while True:
    pods = get_all_pods()
    for pod in pods:
        if pod.node == nil:
            assignNode(pod)
Kubernetes uses controller patterns to maintain and update cluster state, and the scheduler controller is solely responsible for pod scheduling decisions. The scheduler constantly watches the Kubernetes API for unscheduled pods, and when such pods are found, makes a decision on which node the pods should be scheduled/placed.
The scheduler’s decision to start a new pod goes through these three stages:
- Node filtering
- Node priority calculation
- Actual scheduling operation
how the scheduler works: a very quick code walkthrough
This is basically just what I figured out from reading the code.
We’ll start in scheduler.go. (I actually concatenated all the files in the scheduler together which I found helpful for jumping around and navigating.)
The core loop in the scheduler (as of commit e4551d50e5) is:
(link)
go wait.Until(sched.scheduleOne, 0, sched.config.StopEverything)
This basically means “run sched.scheduleOne forever”. Cool, what does that do?
func (sched *Scheduler) scheduleOne() {
	pod := sched.config.NextPod()
    // do all the scheduler stuff for `pod`
}
Okay, what is this NextPod() business? Where does that come from?
func (f *ConfigFactory) getNextPod() *v1.Pod {
	for {
		pod := cache.Pop(f.podQueue).(*v1.Pod)
		if f.ResponsibleForPod(pod) {
			glog.V(4).Infof("About to try and schedule pod %v", pod.Name)
			return pod
		}
	}
}
Okay, that’s pretty simple! There’s a queue of pods (podQueue) and the next pod comes from that queue.
But how do pods end up on that queue? Here’s the code that does that:
podInformer.Informer().AddEventHandler(
	cache.FilteringResourceEventHandler{
		Handler: cache.ResourceEventHandlerFuncs{
			AddFunc: func(obj interface{}) {
				if err := c.podQueue.Add(obj); err != nil {
					runtime.HandleError(fmt.Errorf("unable to queue %T: %v", obj, err))
				}
			},
Basically there’s an event handler that, whenever a new pod is added, puts it on the queue.
how the scheduler works, in English
Okay now that we’ve looked through the code, here’s a summary in English:
- At the beginning, every pod that needs scheduling gets added to a queue
- When new pods are created, they also get added to the queue
- The scheduler continuously takes pods off that queue and schedules them
- That’s it
One interesting thing here is that – if for whatever reason a pod fails to get scheduled, there’s nothing in here yet that would make the scheduler retry. It’d get taken off the queue, it fails scheduling, and that’s it. It lost its only chance! (unless you restart the scheduler, in which case everything will get added to the pod queue again)
Of course the scheduler is actually smarter than that – when a pod fails to schedule, in general it calls an error handler, like this:
host, err := sched.config.Algorithm.Schedule(pod, sched.config.NodeLister)
if err != nil {
	glog.V(1).Infof("Failed to schedule pod: %v/%v", pod.Namespace, pod.Name)
	sched.config.Error(pod, err)
This sched.config.Error function call adds the pod back to the queue of things that need to be scheduled, and so it tries again.
wait why did our pod get stuck then?
This is pretty simple – it turned out that the Error function wasn’t always being called when there was an error. We made a patch to call the Error function properly and that seems to have made it recover properly! Cool!
why is the scheduler designed this way?
I feel like this design would be more robust:
while True:
    pods = get_all_pods()
    for pod in pods:
        if pod.node == nil:
            assignNode(pod)
So it makes sense to me that it would be too slow to query for all 30,000 pods in your system every time you want to schedule a new pod, and that you’d actually want to do something more complicated.
what the scheduler actually uses: kubernetes “informers”
I want to talk about one thing I learned about that seems very important to the design of all kubernetes controllers! That’s the idea of an “informer”. Luckily there actually is documentation about this that I found in by googling “kubernetes informer”.
This very useful document is called Writing Controllers and it gives you design advice when you’re writing a controller (like the scheduler or the cronjob controller). VERY COOL.
If I’d found this document in the first place I think I would have understood what is going on a little more quickly.
So! Informers! The doc says this:
Use SharedInformers. SharedInformers provide hooks to receive notifications of adds, updates, and deletes for a particular resource. They also provide convenience functions for accessing shared caches and determining when a cache is primed.
Basically when a controller runs it creates an “informer” (for example a “pod informer”) which is in charge of
- listing all pods in the first place
- telling you about updates
The cronjob controller does not use an informer (using informers is more complicated, and I think it just doesn’t care as much about performance yet), but many (most?) other controllers do. In particular, the scheduler uses informers! You can see it configuring its informer here.
requeueing
There’s actually also some guidance about how to handle requeuing of items that you’re handling in the “writing controllers” documentation!
Percolate errors to the top level for consistent re-queuing. We have a workqueue.RateLimitingInterface to allow simple requeuing with reasonable backoffs.
Your main controller func should return an error when requeuing is necessary. When it isn’t, it should use utilruntime.HandleError and return nil instead. This makes it very easy for reviewers to inspect error handling cases and to be confident that your controller doesn’t accidentally lose things it should retry for.
This seems to be good advice, it seems tricky to handle all errors correctly and so having a simple way to make sure reviewers can tell errors are being handled correctly is important! Cool!
you should “sync” your informers (or should you?)
Okay, this is the last interesting thing I learned.
Informers have this concept of a “sync”. A sync is a little bit like restarting the program – you get a list of every resource you were watching, so that you can check that it’s actually okay. Here’s what the “writing controllers” guidance has to say about syncing.
Watches and Informers will “sync”. Periodically, they will deliver every matching object in the cluster to your Update method. This is good for cases where you may need to take additional action on the object, but sometimes you know there won’t be more work to do.
In cases where you are certain that you don’t need to requeue items when there are no new changes, you can compare the resource version of the old and new objects. If they are the same, you skip requeuing the work. Be careful when you do this. If you ever skip requeuing your item on failures, you could fail, not requeue, and then never retry that item again.
So this implies “you should sync, if you don’t sync then you can end up in a situation where an item gets lost and never retried”. Which is what happened to us!
the kubernetes scheduler doesn’t resync
So!! Once I learned about this idea of a “sync”, I was like.. wait, does that mean the kubernetes scheduler never resyncs? It seems that the answer is “no, it doesn’t!”. here’s the code:
informerFactory := informers.NewSharedInformerFactory(kubecli, 0)
// cache only non-terminal pods
podInformer := factory.NewPodInformer(kubecli, 0)`
Those numbers 0 – those are the “resync period”, which I interpret to mean that it never resyncs. Interesting!! Why doesn’t it ever resync? I don’t know for sure, but
@brendandburns - what is it supposed to fix? I’m really against having such small resync periods, because it will significantly affect performance.
and
I agree with @wojtek-t . If resync ever fixes a problem, it means there is an underlying correctness bug that we are hiding. I do not think resync is the right solution.
So it seems like the project maintainers decided never to resync, because when there are correctness bugs, they’d like them to be surfaced and fixed instead of hidden by a resync.
The scheduler will check which nodes are compatible with running this workload. It does so by running all nodes through a set of filters and removing those, which are not compatible from consideration. The following filters are used:
Volume Filters

Using these checks, the scheduler knows in advance which nodes can’t run the pod, so it will remove those nodes from the list of possible targets. For example, is the data volume required by the pod in the same availability zone as the node? Can it be attached without conflicting with the underlying cloud provider rules? (In AWS, for example, it’s impossible to attach an EBS volume from one availability zone, to a node in another zone). Also, the volume topology constraints that were specified during volume definition need to be satisfied (a volume requested by a pod might have a “node-affinity” constraint that only allows it to attach to a specific set of nodes, or specifically prohibits it from attaching to some nodes).
Next Are Resource Filters:
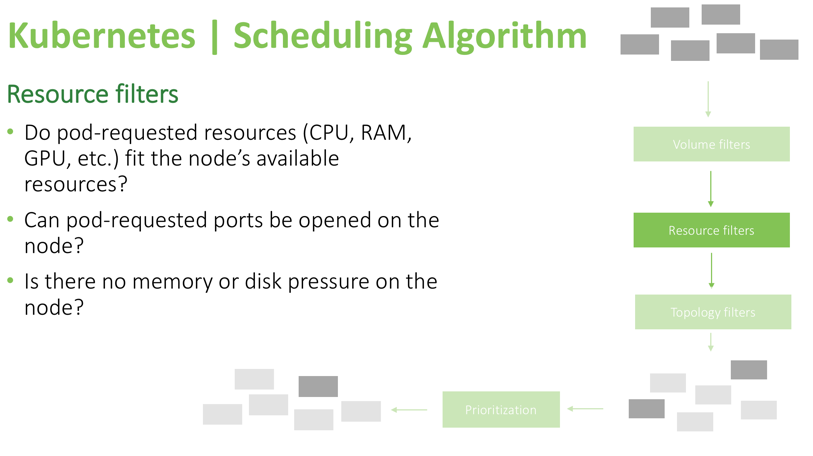
These filters above are pretty straightforward. The scheduler will check if the resources requested by the pod are available, ensure that there is no pressure on the node, like low memory or low disk space, and confirm whether requested ports can be opened on the node. For example, if the pod specified that it needs to bind to host port 8080, but another pod with similar requirements is already occupying that port on a worker node, the node will be removed from consideration and will not be a candidate to run that pod.
The Last Set of Filters Is Affinity Selectors:
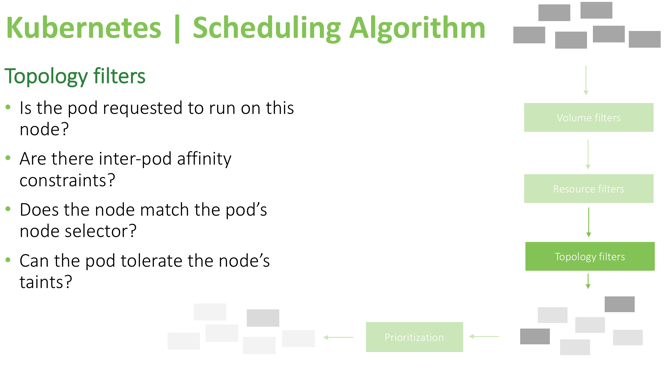
In this example, you can see that the scheduler verifies if the pod explicitly stated it needs to run on particular nodes or if it specifies pod-affinity (if it needs to run only when some other pods are present or avoid running on the same node with specific pods). Also, this filter checks to see if the pod can tolerate a node’s taints and node conditions like dedicated_gpu/maintenance/staging_only (an example of custom user-defined taints), or memory-pressure/unreachable/disk-pressure (an example of system applied taints). Tolerations are specified in the pod definition and allow a pod to be scheduled on nodes with some specific taints. In other words, all other pods will be denied from scheduling or executing on a node, except the pods which explicitly state that they are allowed to run there. You can read more about taints and tolerations here. These are important mechanisms to fine-tune the scheduling behavior of Kubernetes.
After these filtering steps are completed, there is a chance that no available nodes for this pod will be found. In that case, the pod will remain unscheduled, and it will be reflected in the dashboard including the reason for failure to run the pod (for example, “nodes that can satisfy these pod constraints are not found” or “there is not enough memory to schedule the pod”). If the filtering stage left you several nodes to choose from, the scheduler will run a prioritization check based on the following parameters:
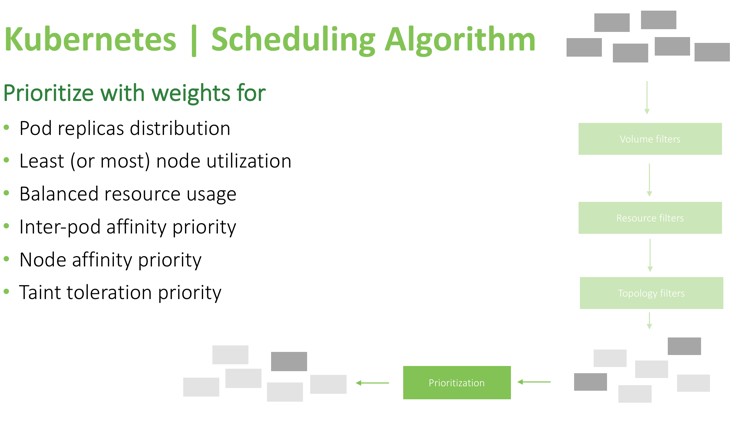
After this check is completed, the scheduler calculates a score for each node, and the highest scoring node will run that pod.
Below is a list of methods to control placement of pods during pod definition, sorted by complexity from basic resource requirements to advanced methods like using a custom scheduler controller:
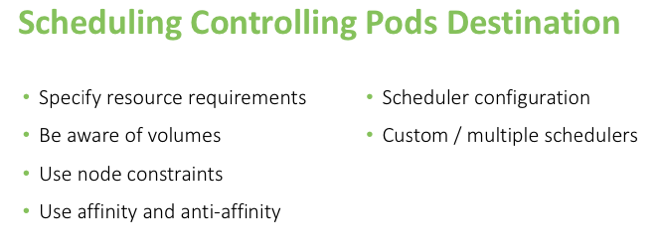
The first basic method to help the scheduler make the right decisions is setting memory/CPU requests and limits. Requests are used during the scheduling stage, and limits are used when the pod is already running (Limits determine the pod QOS level. You can read more about cluster rebalancing mechanisms and pod evictions in our in-depth article here).
We can avoid issues with volume compatibility following these basic rules:
- Make sure requested volumes are in the same availability zone as the desired nodes. For example, when you have a set of nodes in zone “A” where you want a pod to run, and a volume in zone “B” where you need to use that same pod, first make sure to clone those volumes into the correct zone where the needed nodes reside, or spin up a few new nodes in the zone where that special volume resides, so it can be attached to these nodes.
- Make sure the node didn’t reach its volume limit (for example in Azure cloud there is a limit of how many volumes can be attached).
- Do not specify volumes that are already attached to separate nodes. If a pod needs a few volumes but those are already exclusively attached to another host, that pod will fail to run because the condition of having both volumes mounted cannot be satisfied.
- Use volume topology constraints, by specifying a list of nodes where a volume can or cannot be attached.
Also, we have several constraint options available that should be specified in the pod definition:
- Directly set a nodeName where this pod should run.
- Use nodeSelector to specify labels that a node should possess to be able to run the pod.
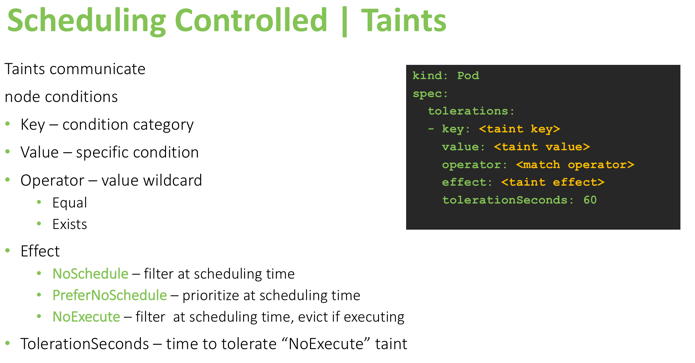
- Taints (on the node) and tolerations (on pods) – As mentioned above, taints are indicators of node condition; no pods will be scheduled on a tainted node unless they specify “toleration” for that type of taint. A node can have multiple taints, and a pod can have multiple tolerations.
The following image illustrates taint types and an example toleration definition:
The next constraint mechanisms are affinity preferences that can be set in the pod definition. Affinity has two scopes at the moment and is a feature still in development. Only scheduling stage affinity is available now, as illustrated in the image below:
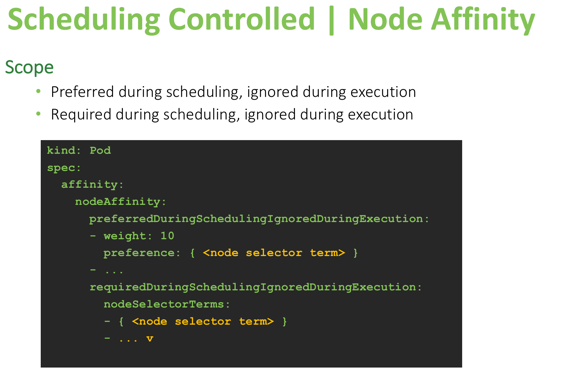
When you use the “preferred during scheduling” option, Kubernetes will do its best to schedule the pods following that setting. If “required during scheduling” is used, it will force that condition and will not run the pod on a node unless that condition is satisfied.
There are several different ways to specify the pod preferences for the nodes on which to run. A simple preference, familiar to many, is a “node selector” (specify particular label directly) that will cause that pod to be scheduled only on these nodes that have an exact label value. Another way of specifying node preference is by using node affinity with “node selector terms,” which allows use of operators like those shown on the bottom part of the image below. This allows users to specify a flexible set of rules, based on which the decision to schedule or avoid scheduling will be made.